How to Turn Off Google Assistant on ZTE Geek 2
The smartphone ZTE Geek 2, like any other device on Android, has a built-in voice Google assistant. It reacts to the user’s commands and performs the set tasks. However, sometimes the helper activates accidentally, that makes you want to turn off Google assistant on ZTE Geek 2. Further – more about ways to do this.
Disabling of the voice command
The phrase «OK, Google» activates assistant on ZTE Geek 2. At the same time, the smartphone might mistakenly recognize the user’s words and take for the command the sound from different acoustic devices. If you do not want to feel discomfort from accidentally calling of the assistant, it is recommended to turn of the voice command in one of two ways.
Google app
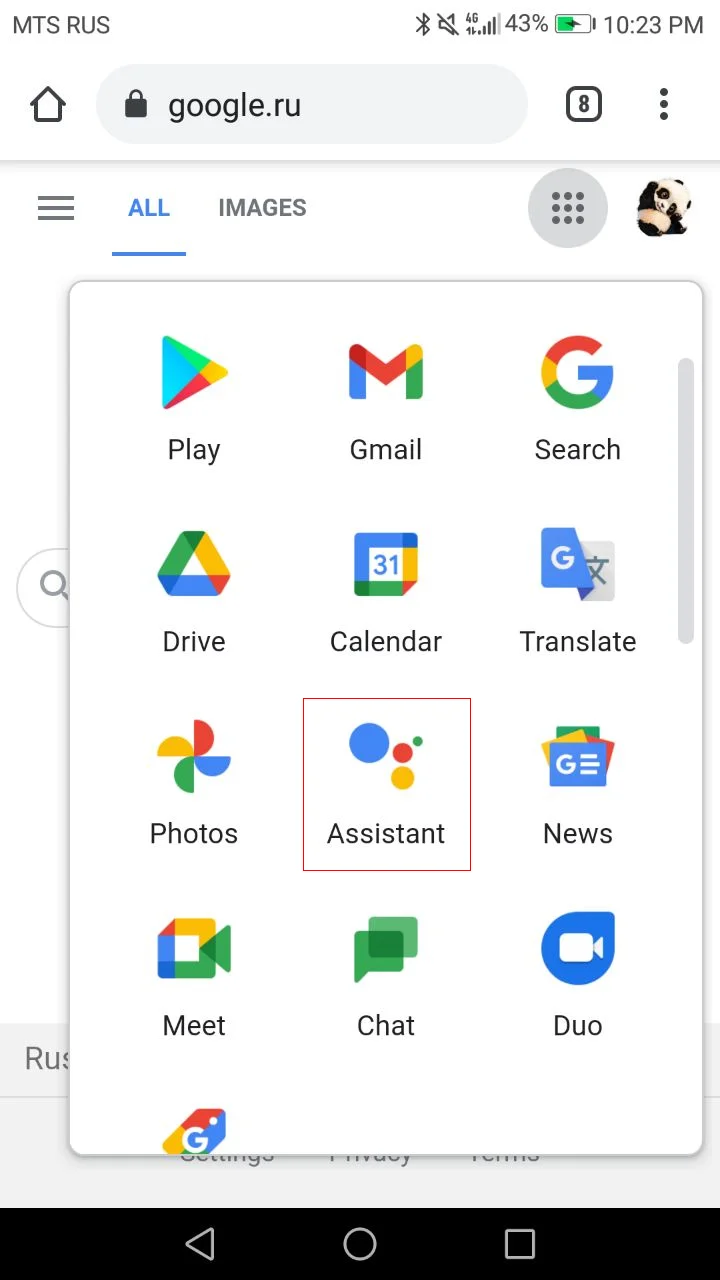
Since the assistant has a direct relation to the Google company, for its disabling you can use the branded app. It is located either on the home screen or on the desktop in the «Google» folder. After the launching, you need to do next:
- Press the button, which looks like three stripes.
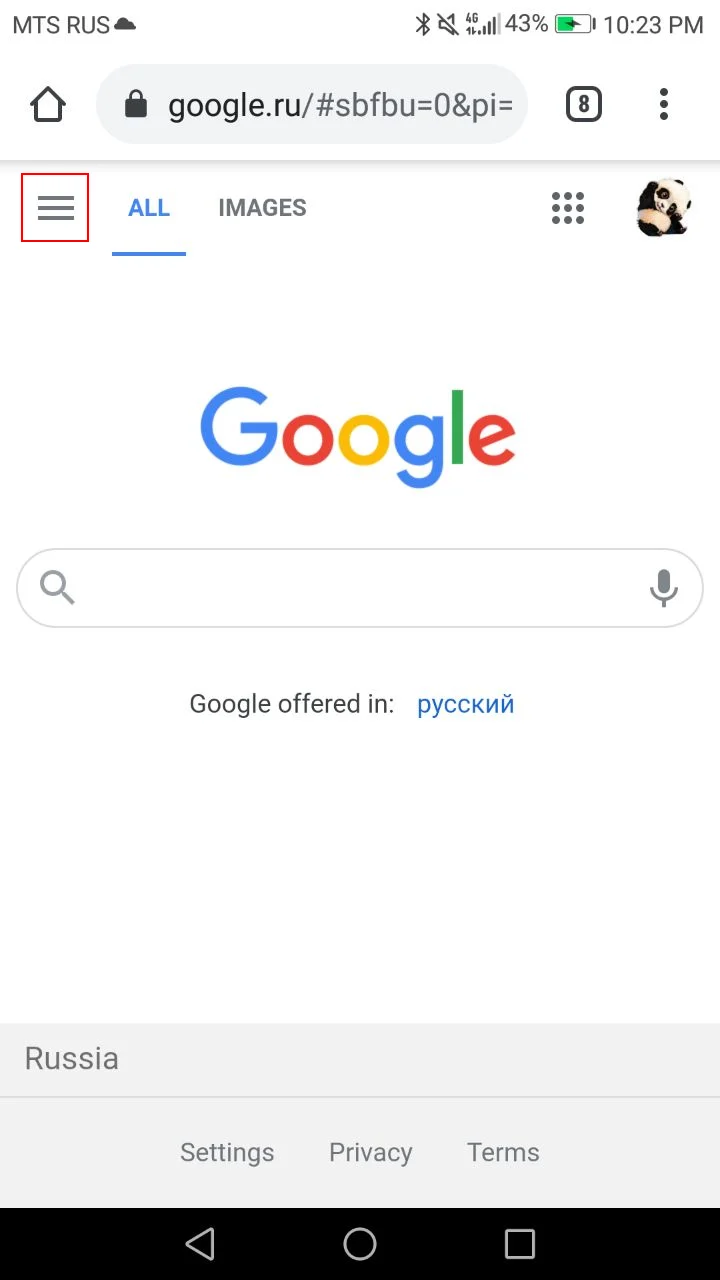
- Open «Settings».
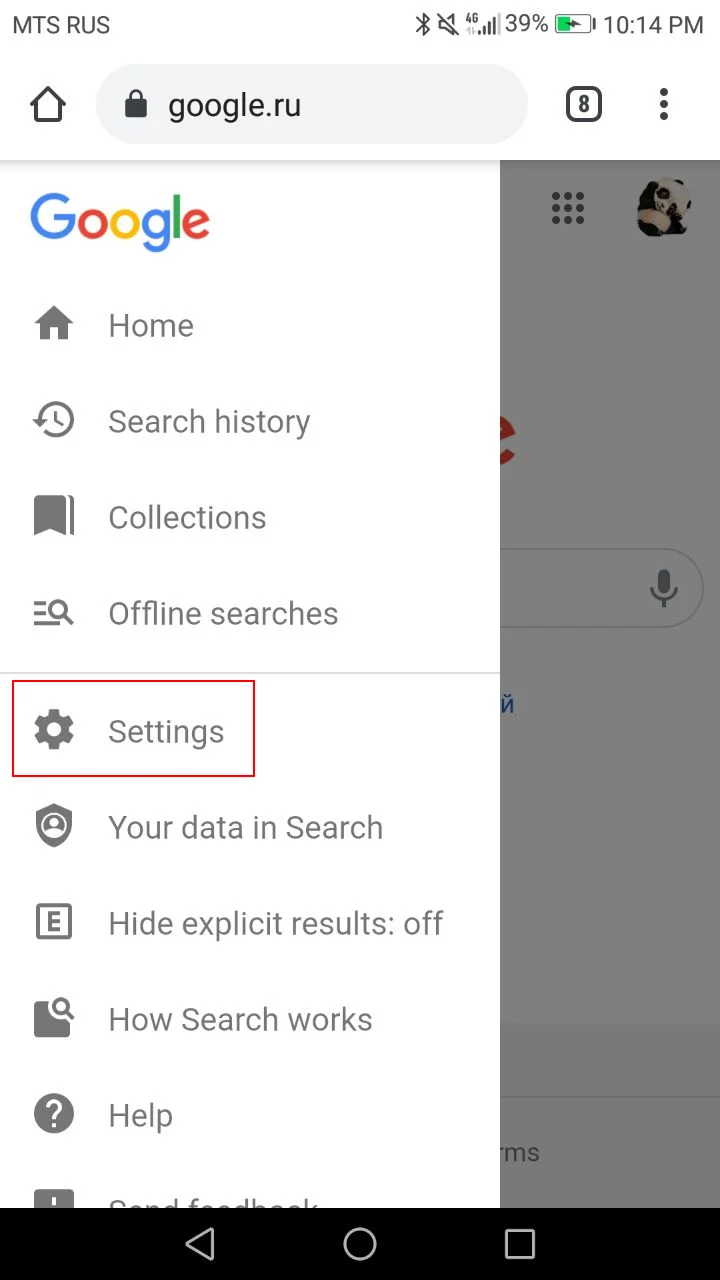
- Go to the section «Voice search».
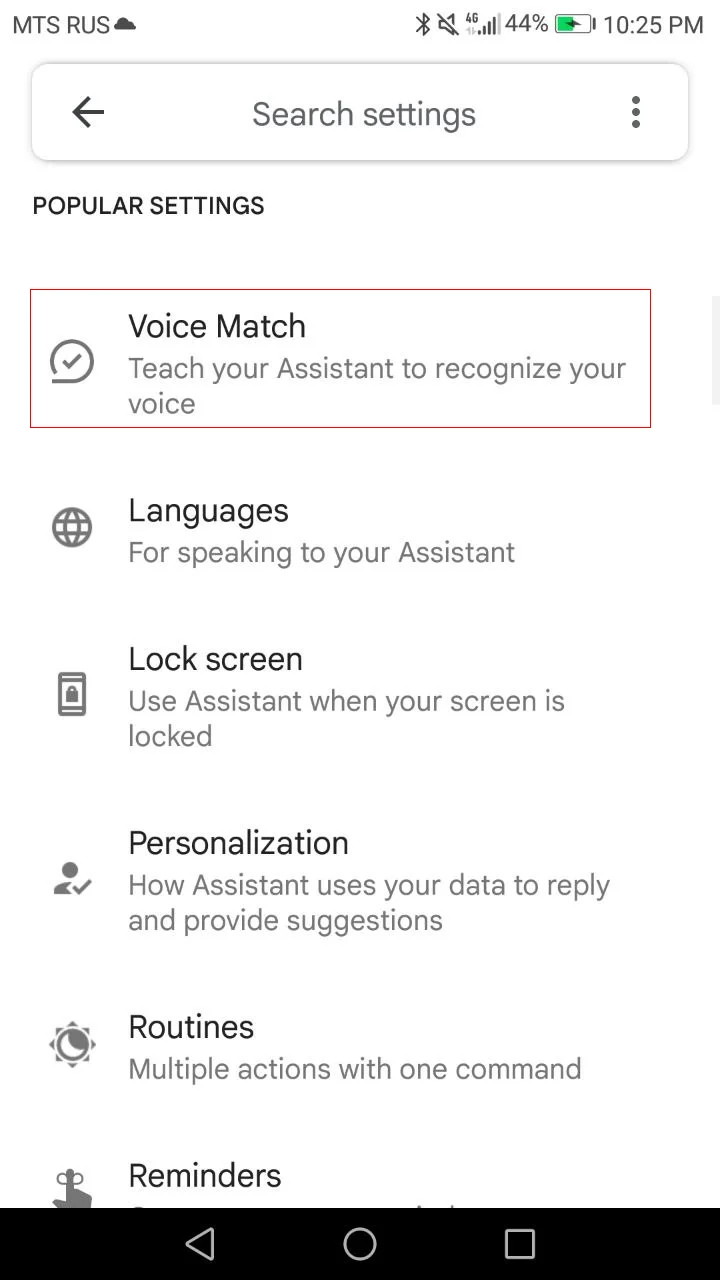
- Next, go to the «Recognition Ok, Google» tab.
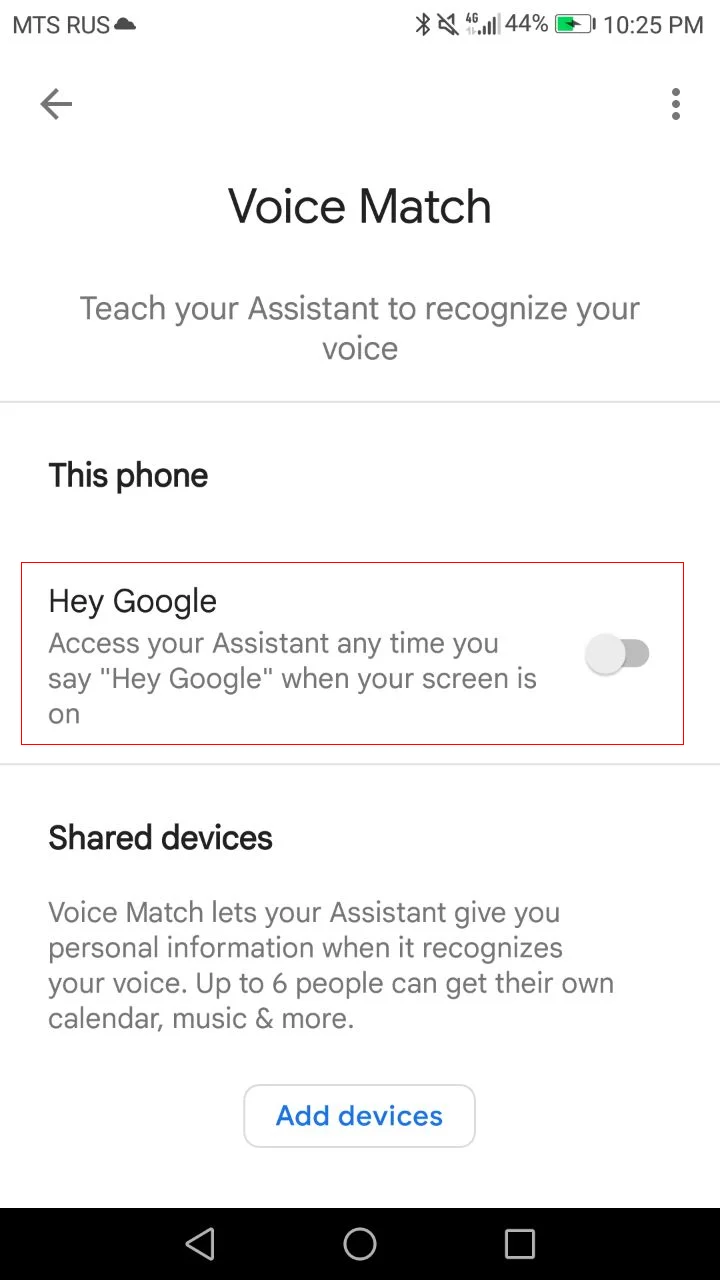
- Deactivate the slider opposite the needed item.
The user is suggested to deactivate recognition on all screens, in the Google app or during the maps using. After that, the helper will stop to launch by the voice command.
Phone settings
The assistant is tightly integrated into the smartphone’s operating system. Therefore, you can disable it through the settings of ZTE Geek 2.
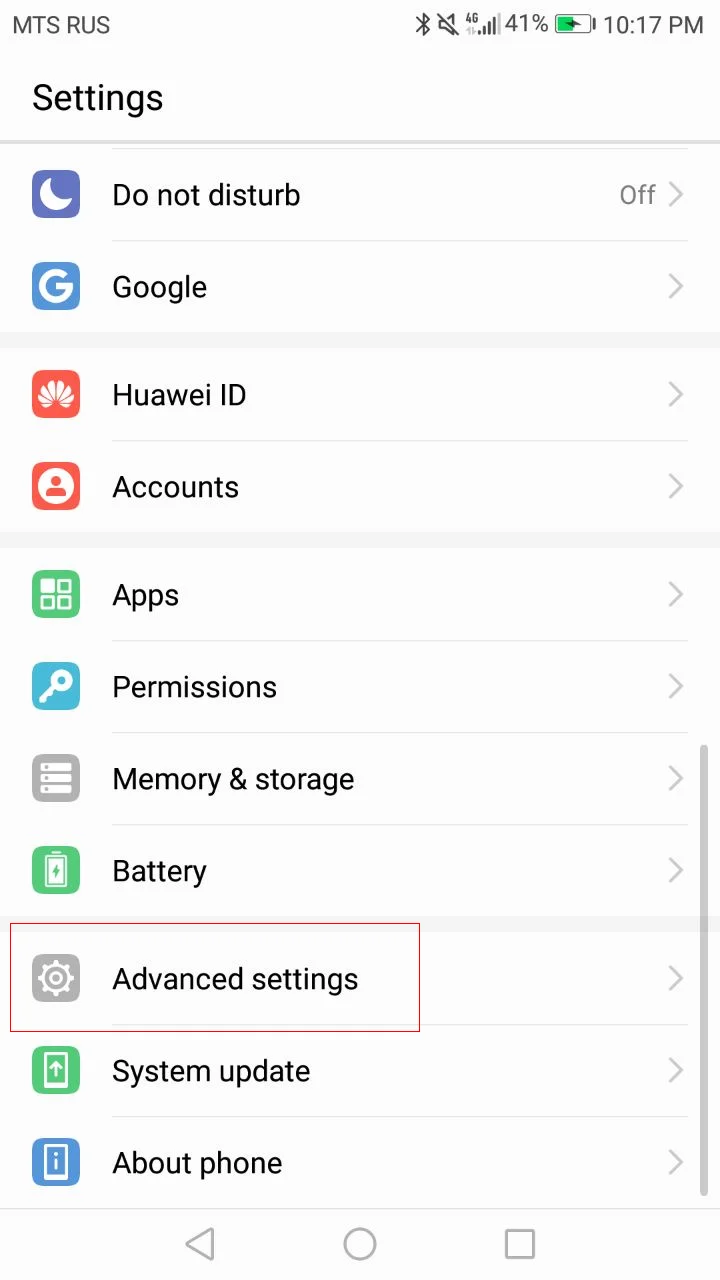
- Launch the phone’s settings.
- Go to the section «Advanced settings».
- Open the tab «Language and input».
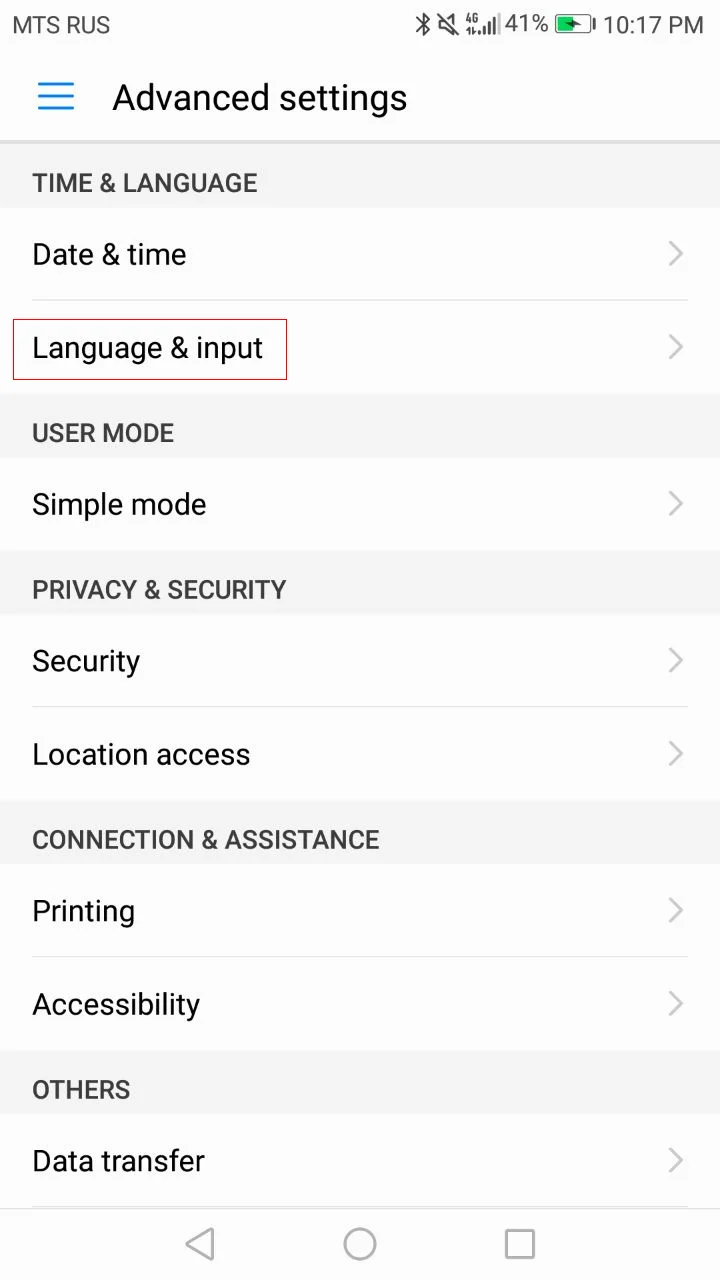
- Go to the «Google voice typing» and then to the «Recognition Ok, Google».

- Turn off the function in the mode you need.
Pay attention that names of menu items depend on version of the phone operating system. That is why the instruction for your Android on ZTE Geek 2 can be different.
Full disabling of the assistant
If you want, you can fully turn off Google assistant on ZTE Geek 2. To do this you need to:
- Launch Google official app.
- Log in to your account.
- Go to the section «More».
- Select «General settings» and then «Google assistant».
- Move the slider to the «Off» position.
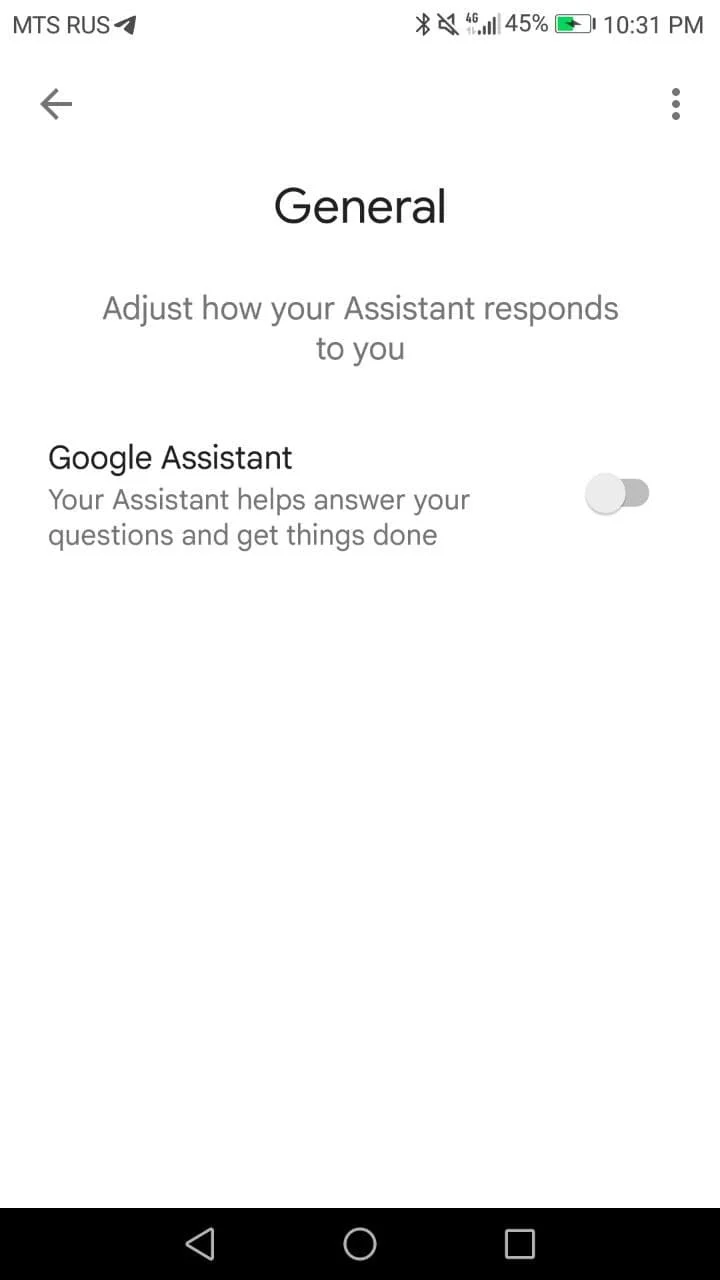
After you disable Google assistant, it will stop making itself felt. The helper will not respond to either the voice command or pressing the hotkey. Therefore, the probability of the accidental launch will be reduced to zero.
Share this page with your friends:See also:
How to flash ZTE Geek 2
How to root ZTE Geek 2
Hard reset for ZTE Geek 2
How to reboot ZTE Geek 2
How to unlock ZTE Geek 2
What to do if ZTE Geek 2 won't turn on
What to do if ZTE Geek 2 doesn't charge
What to do if ZTE Geek 2 doesn't connect to PC via USB
How to take a screenshot on ZTE Geek 2
How to reset FRP on ZTE Geek 2
How to call recording on ZTE Geek 2
How to update ZTE Geek 2
How to connect ZTE Geek 2 to TV
How to clear the cache on ZTE Geek 2
How to backup ZTE Geek 2
How to disable ads on ZTE Geek 2
How to clear storage on ZTE Geek 2
How to increase font on ZTE Geek 2
How to share internet on ZTE Geek 2
How to transfer data to ZTE Geek 2
How to unlock bootloader on ZTE Geek 2
How to recover photos on ZTE Geek 2
How to record the screen on ZTE Geek 2
How to find blacklist in ZTE Geek 2
How to set up fingerprint on ZTE Geek 2
How to block number on ZTE Geek 2
How to enable auto-rotate on ZTE Geek 2
How to set up or turn off an alarm on ZTE Geek 2
How to change ringtone on ZTE Geek 2
How to enable battery percentage on ZTE Geek 2
How to turn off notifications on ZTE Geek 2
How to turn off the lock screen on ZTE Geek 2
How to delete app on ZTE Geek 2
How to recover contacts on ZTE Geek 2
Where is the recycle bin on ZTE Geek 2
How to install WhatsApp on ZTE Geek 2
How to set contact photo in ZTE Geek 2
How to scan QR code on ZTE Geek 2
How to connect ZTE Geek 2 to computer
How to install SD card in ZTE Geek 2
How to update Play Store in ZTE Geek 2
How to install Google Camera in ZTE Geek 2
How to enable USB debugging on ZTE Geek 2
How to turn off ZTE Geek 2
How to charge ZTE Geek 2
How to use the camera on ZTE Geek 2
How to find lost ZTE Geek 2
How to set password on ZTE Geek 2
How to turn on 5g on ZTE Geek 2
How to turn on VPN on ZTE Geek 2
How to install apps on ZTE Geek 2
How to insert a SIM card in ZTE Geek 2
How to enable and configure NFC on ZTE Geek 2
How to set time on ZTE Geek 2
How to connect headphones to ZTE Geek 2
How to clear browser history on ZTE Geek 2
How to disassemble ZTE Geek 2
How to hide an app on ZTE Geek 2
How to download YouTube videos on ZTE Geek 2
How to unblock a contact on ZTE Geek 2
How to turn on the flashlight on ZTE Geek 2
How to split the screen on ZTE Geek 2
How to turn off the camera sound on ZTE Geek 2
How to trim video on ZTE Geek 2
How to check RAM in ZTE Geek 2
How to bypass the Google account on ZTE Geek 2
How to fix black screen on ZTE Geek 2
How to change the language on ZTE Geek 2
How to open engineering mode in ZTE Geek 2
How to open recovery mode in ZTE Geek 2
How to find and turn on a voice recorder on ZTE Geek 2
How to make video calls on ZTE Geek 2
ZTE Geek 2 sim card not detected
How to transfer contacts to ZTE Geek 2
How to enable/disable «Do not disturb» mode on ZTE Geek 2
How to enable/disable answerphone on ZTE Geek 2
How to set up face recognition on ZTE Geek 2
How to set up voicemail on ZTE Geek 2
How to listen to voicemail on ZTE Geek 2
How to check the IMEI number in ZTE Geek 2
How to turn on fast charging on ZTE Geek 2
How to replace the battery on ZTE Geek 2
How to update the application on ZTE Geek 2
Why the ZTE Geek 2 discharges quickly
How to set a password for apps in the ZTE Geek 2
How to format ZTE Geek 2
How to install TWRP on ZTE Geek 2
How to set up call forwarding on ZTE Geek 2
How to empty the recycle bin on ZTE Geek 2
Where to find the clipboard on ZTE Geek 2
How to Turn Off Google Assistant on Another Phones
