How to Use the Camera on the Blackview P10000 Pro
The Blackview P10000 Pro is not just for socialising with loved ones and colleagues, but also for mobile photography. The device has a good camera to capture important moments in life. And to get quality pictures, you need to use the camera on the Blackview P10000 Pro properly.
Features of the Camera app
For mobile photography and video on any Android smartphone, including the Blackview P10000 Pro, the standard Camera app is used. Its icon is located on the home screen, and after tapping on it you'll be taken to the camera control interface.
Standard camera mode
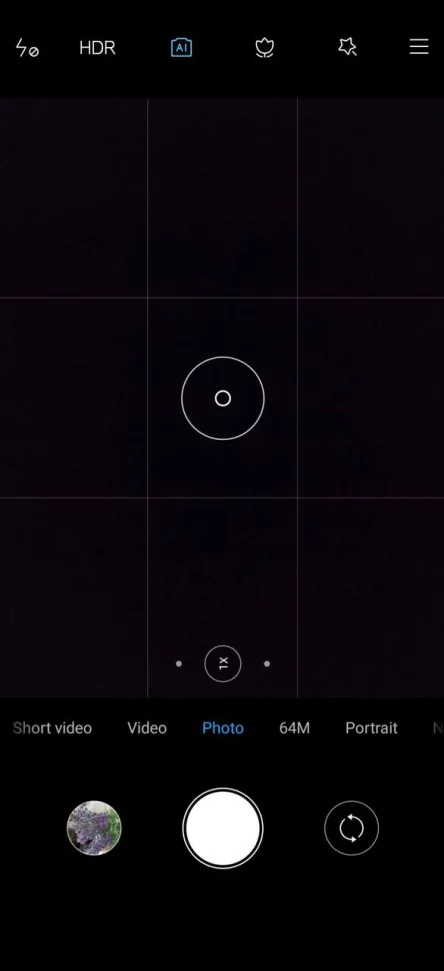
After launching the app, you are in automatic mode. It may be called "Auto" or "Photo". This mode is designed to create photos with the optimum balance of all settings so that they have good clarity and colour reproduction. A photo is created by pressing the circular shutter button.

Normally, the Blackview P10000 Pro's camera focuses well on the subject itself. But if the focus leaves much to be desired, you can force focus on the desired subject by tapping on the smartphone screen.
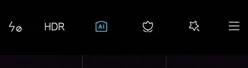
At the top of the screen you will see additional options that may come in handy when taking pictures. In particular, you can activate HDR for more accurate colour reproduction of overly bright and dark areas of the frame, apply Artificial Intelligence (AI) effects or activate the flash, for example.
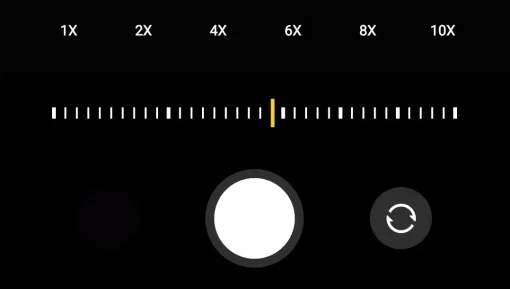
To zoom in on a picture, you can use the zoom function. Move your fingers from the centre of the screen to the edges and the interface displays a handy bar that allows you to adjust the degree of zoom.
Switching to a front camera
You can shoot not only with the main camera but also with the front camera. To switch to the front lens, press the arrow circle button to the right of the shutter button. Here you can also adjust the front camera for optimum shooting by selecting additional effects or activating AI.
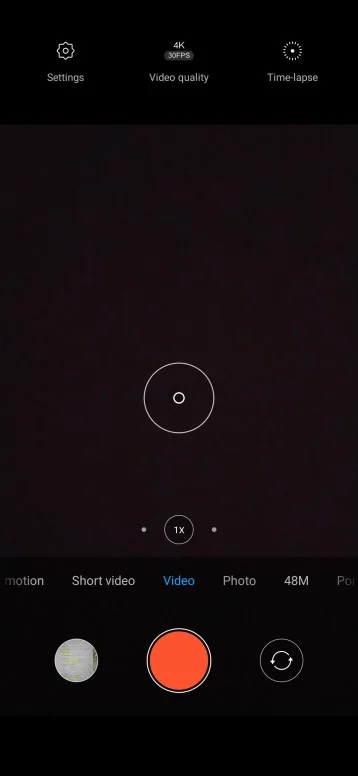
Switching between modes
The Blackview P10000 Pro's camera not only helps you capture photos, but also videos. Use the menu above the shutter button to switch between shooting modes. Here are the main modes, the number of which depends directly on the firmware version of your phone.
For example, you can switch to 'Night' mode to make your pictures brighter in the evening, or to 'Portrait' mode to create pictures with a blurred background effect (bokeh). A tap on the Video tab takes you to the Video window. Simply press the red Rec button to start recording.
On the left you can see the 'Pro' section, which contains options for manual adjustment for photos. Here, the user adjusts settings such as white balance, image focus, ISO and more.

Switching between lenses
If your version of the Blackview P10000 Pro has more than one camera, you can switch between the rear and front lenses. For example, to switch to the wide-angle module, you need to tap on the 0.6X mug.

If you want to switch to macro mode, you'll have to go to an extra menu, accessed by pressing the three-bar button.

Here you will find the "Macro" mode and other settings such as horizon line and grid activation. This window also provides a button to switch to settings mode.
Settings
In the settings you can switch the watermark on or off, adjust the image quality and set hotkeys for quick snapshots.
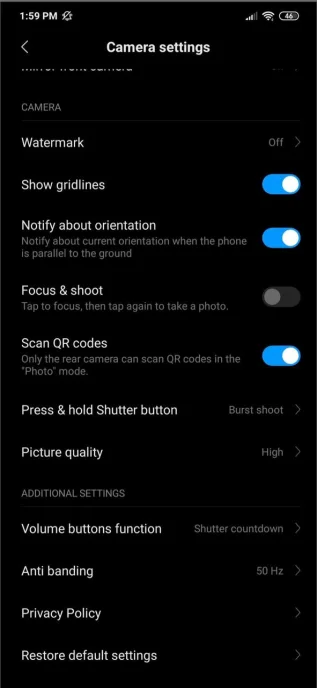
This section is very large, so don't be lazy to study it carefully to make your Blackview P10000 Pro photos and videos as eye-catching as possible.
Share this page with your friends:See also:
How to flash Blackview P10000 Pro
How to root Blackview P10000 Pro
Hard reset for Blackview P10000 Pro
How to reboot Blackview P10000 Pro
How to unlock Blackview P10000 Pro
What to do if Blackview P10000 Pro won't turn on
What to do if Blackview P10000 Pro doesn't charge
What to do if Blackview P10000 Pro doesn't connect to PC via USB
How to take a screenshot on Blackview P10000 Pro
How to reset FRP on Blackview P10000 Pro
How to call recording on Blackview P10000 Pro
How to update Blackview P10000 Pro
How to connect Blackview P10000 Pro to TV
How to clear the cache on Blackview P10000 Pro
How to backup Blackview P10000 Pro
How to disable ads on Blackview P10000 Pro
How to clear storage on Blackview P10000 Pro
How to increase font on Blackview P10000 Pro
How to share internet on Blackview P10000 Pro
How to transfer data to Blackview P10000 Pro
How to unlock bootloader on Blackview P10000 Pro
How to recover photos on Blackview P10000 Pro
How to record the screen on Blackview P10000 Pro
How to find blacklist in Blackview P10000 Pro
How to set up fingerprint on Blackview P10000 Pro
How to block number on Blackview P10000 Pro
How to enable auto-rotate on Blackview P10000 Pro
How to set up or turn off an alarm on Blackview P10000 Pro
How to change ringtone on Blackview P10000 Pro
How to enable battery percentage on Blackview P10000 Pro
How to turn off notifications on Blackview P10000 Pro
How to turn off Google assistant on Blackview P10000 Pro
How to turn off the lock screen on Blackview P10000 Pro
How to delete app on Blackview P10000 Pro
How to recover contacts on Blackview P10000 Pro
Where is the recycle bin on Blackview P10000 Pro
How to install WhatsApp on Blackview P10000 Pro
How to set contact photo in Blackview P10000 Pro
How to scan QR code on Blackview P10000 Pro
How to connect Blackview P10000 Pro to computer
How to install SD card in Blackview P10000 Pro
How to update Play Store in Blackview P10000 Pro
How to install Google Camera in Blackview P10000 Pro
How to enable USB debugging on Blackview P10000 Pro
How to turn off Blackview P10000 Pro
How to charge Blackview P10000 Pro
How to find lost Blackview P10000 Pro
How to set password on Blackview P10000 Pro
How to turn on 5g on Blackview P10000 Pro
How to turn on VPN on Blackview P10000 Pro
How to install apps on Blackview P10000 Pro
How to insert a SIM card in Blackview P10000 Pro
How to enable and configure NFC on Blackview P10000 Pro
How to set time on Blackview P10000 Pro
How to connect headphones to Blackview P10000 Pro
How to clear browser history on Blackview P10000 Pro
How to disassemble Blackview P10000 Pro
How to hide an app on Blackview P10000 Pro
How to download YouTube videos on Blackview P10000 Pro
How to unblock a contact on Blackview P10000 Pro
How to turn on the flashlight on Blackview P10000 Pro
How to split the screen on Blackview P10000 Pro
How to turn off the camera sound on Blackview P10000 Pro
How to trim video on Blackview P10000 Pro
How to check RAM in Blackview P10000 Pro
How to bypass the Google account on Blackview P10000 Pro
How to fix black screen on Blackview P10000 Pro
How to change the language on Blackview P10000 Pro
How to open engineering mode in Blackview P10000 Pro
How to open recovery mode in Blackview P10000 Pro
How to find and turn on a voice recorder on Blackview P10000 Pro
How to make video calls on Blackview P10000 Pro
Blackview P10000 Pro sim card not detected
How to transfer contacts to Blackview P10000 Pro
How to enable/disable «Do not disturb» mode on Blackview P10000 Pro
How to enable/disable answerphone on Blackview P10000 Pro
How to set up face recognition on Blackview P10000 Pro
How to set up voicemail on Blackview P10000 Pro
How to listen to voicemail on Blackview P10000 Pro
How to check the IMEI number in Blackview P10000 Pro
How to turn on fast charging on Blackview P10000 Pro
How to replace the battery on Blackview P10000 Pro
How to update the application on Blackview P10000 Pro
Why the Blackview P10000 Pro discharges quickly
How to set a password for apps in the Blackview P10000 Pro
How to format Blackview P10000 Pro
How to install TWRP on Blackview P10000 Pro
How to set up call forwarding on Blackview P10000 Pro
How to empty the recycle bin on Blackview P10000 Pro
Where to find the clipboard on Blackview P10000 Pro
How to Use the Camera on Another Phones
