How to Set Up Fingerprint on Zenithink Z102

The developers of Zenithink Z102 managed to create an advanced user protection system. However, many smartphone owners continue to turn to the help of less effective security tools like using a pattern key, unaware of how to set up a fingerprint on Zenithink Z102. The operation of setting up a fingerprint scanner does not take much time and can protect both the phone itself and its separate applications.
How to Add a Fingerprint
Regardless of what kind of information you want to protect on Zenithink Z102, first you need to register the primary fingerprint. Usually you will be prompted to do this after the device is turned on for the first time, but if you skipped this step, you can set up protection after the fact:
- Open your phone settings.
- Go to the "Lock screen and fingerprints" section (sometimes the item you are looking for is called "Biometrics and security").
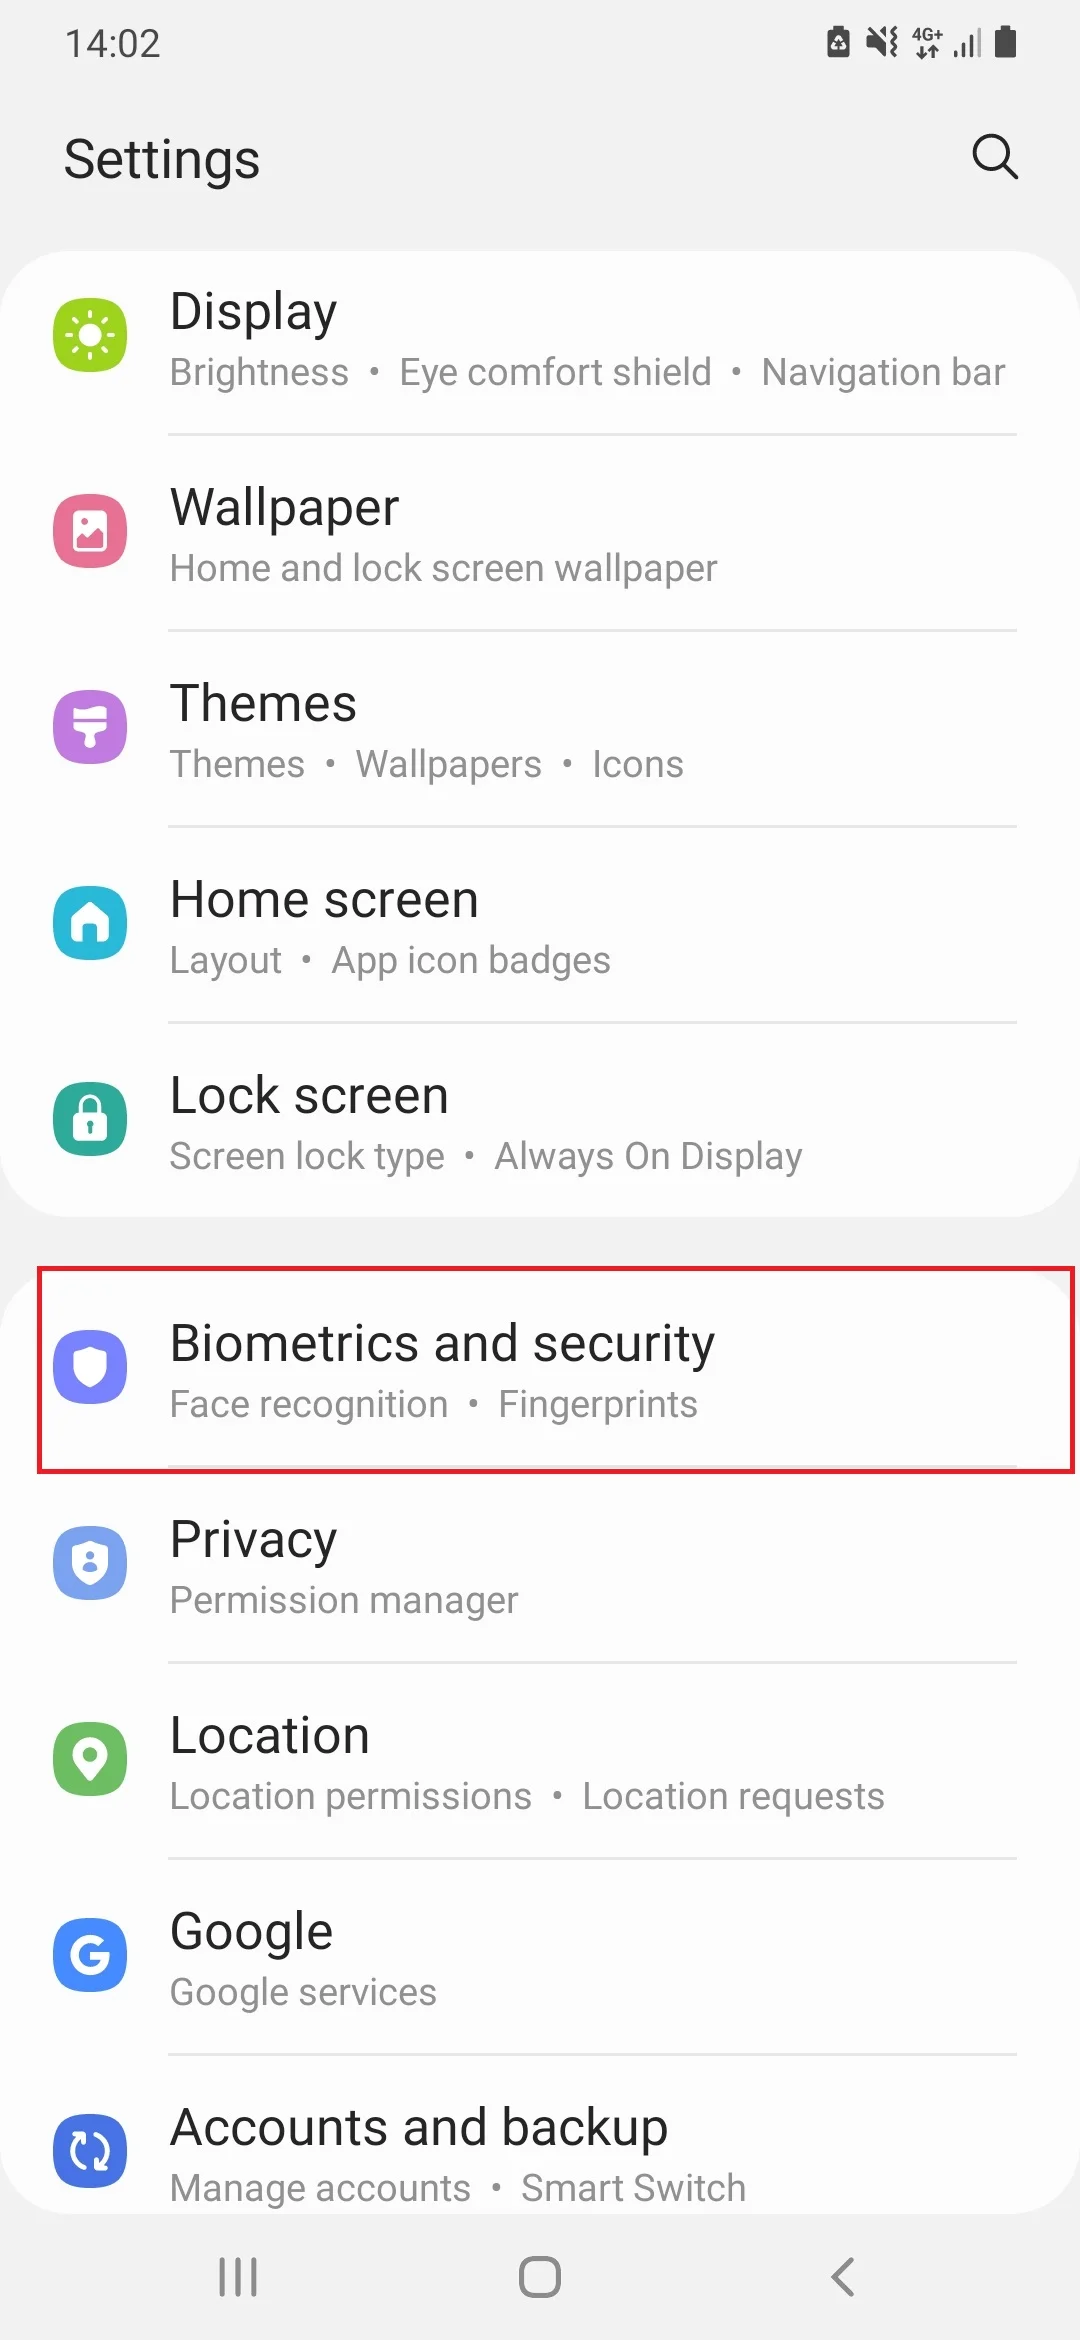
- Select "Fingerprints".
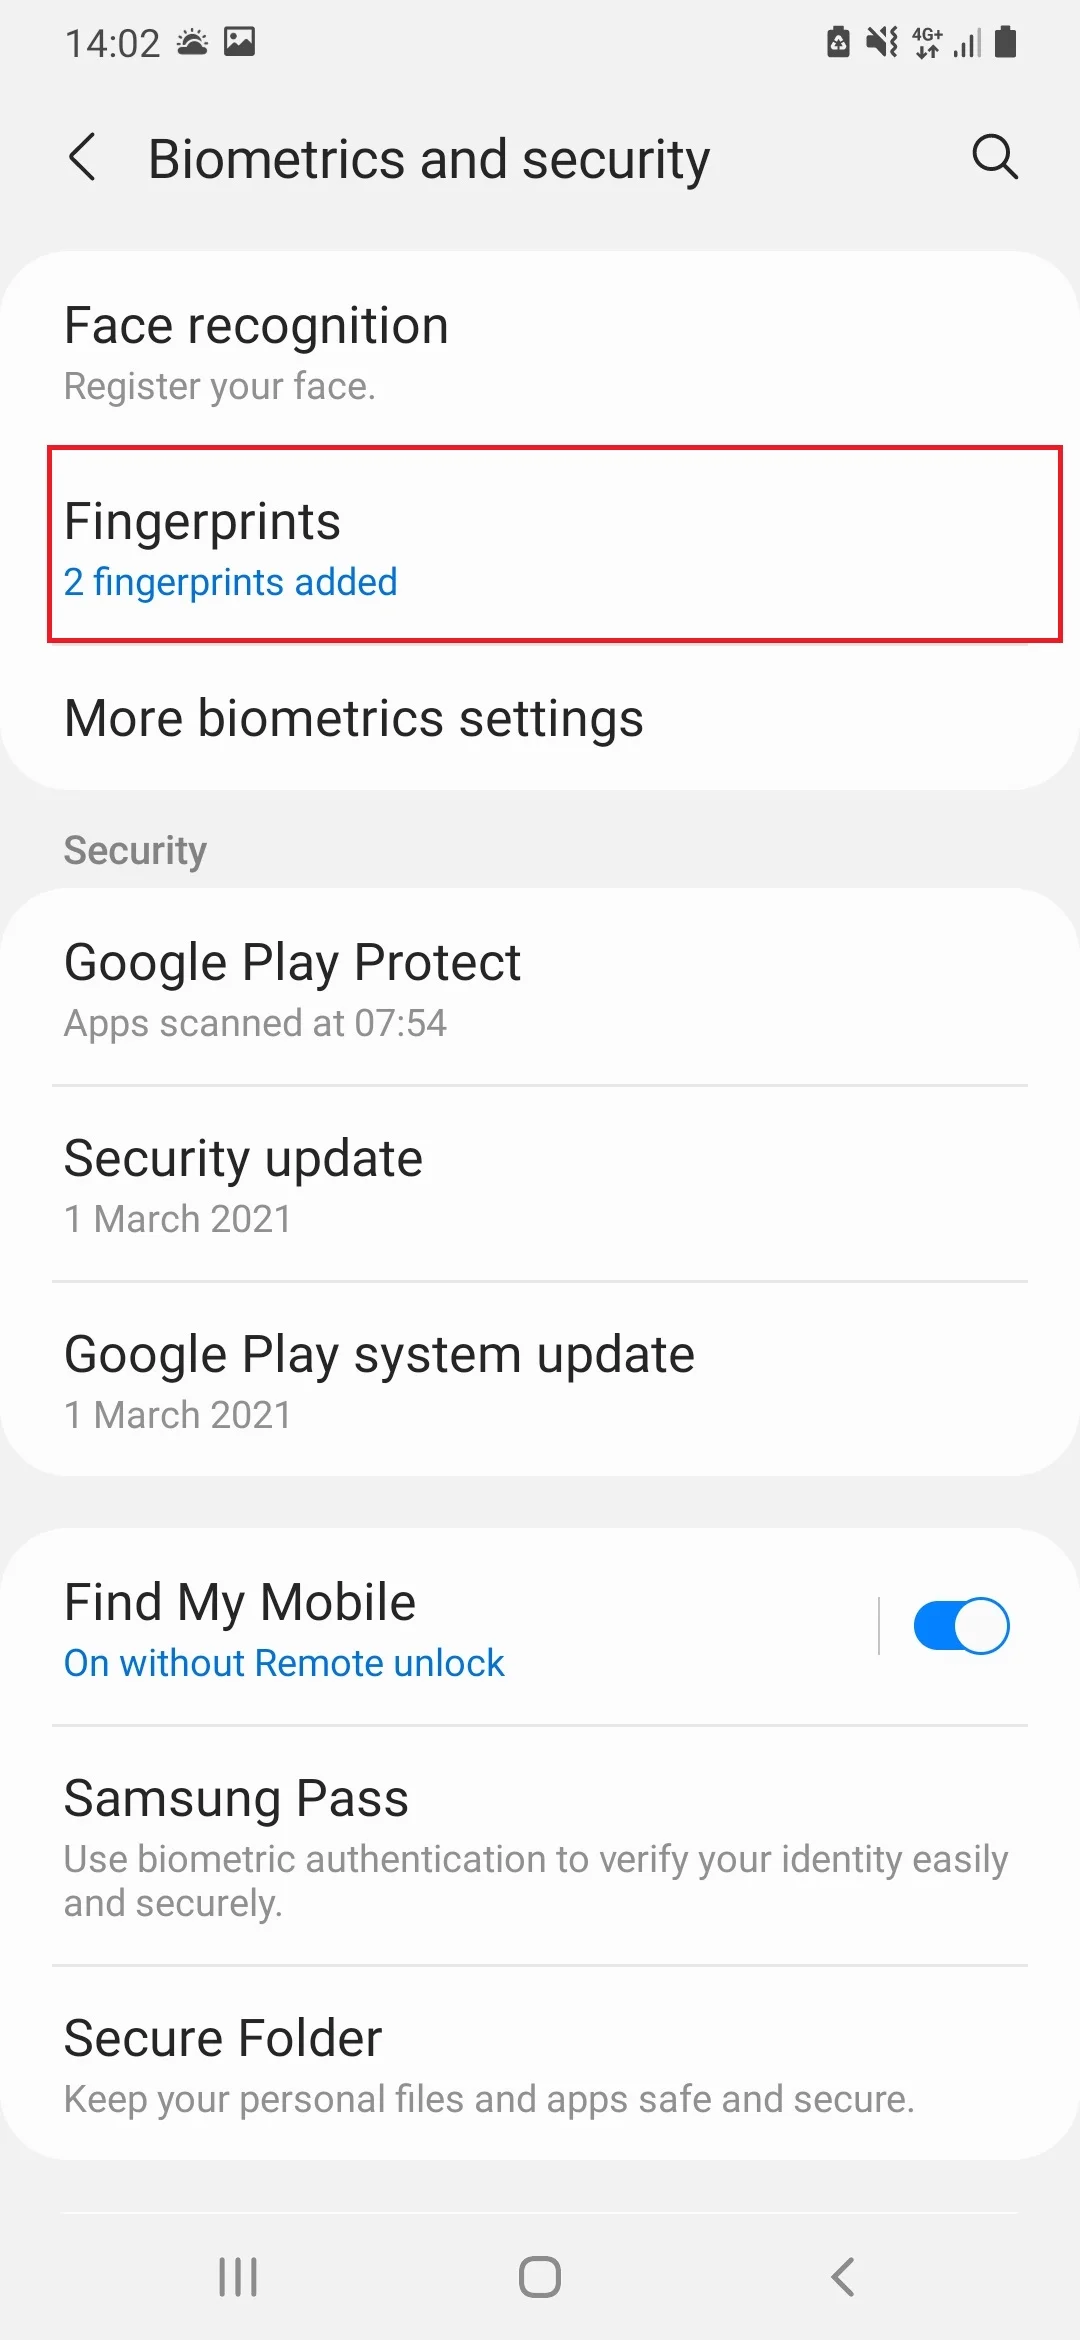
- Press "Add fingerprint".
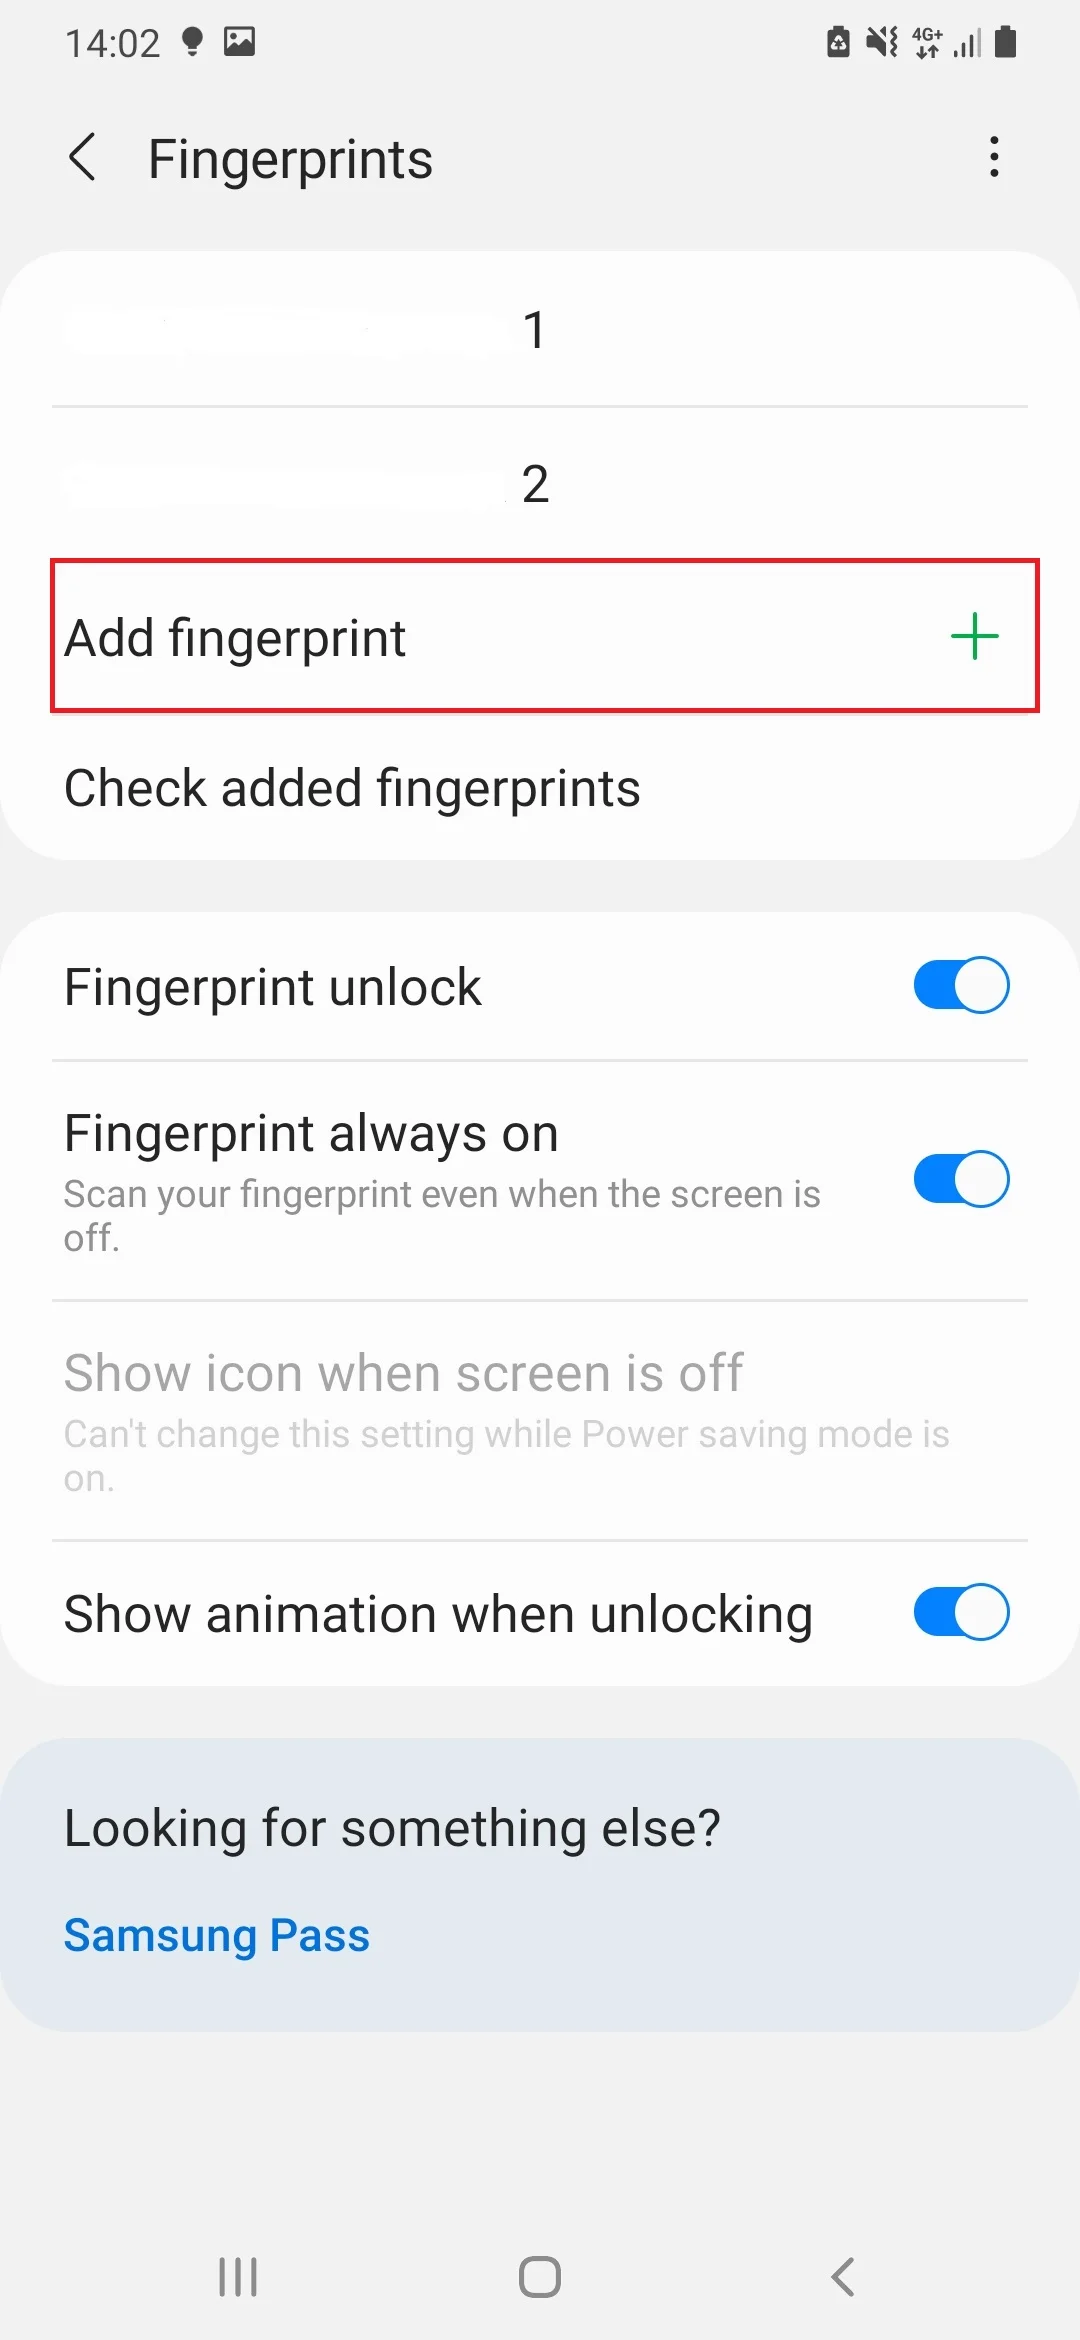
- Follow the instructions that appear on the screen.
During the setup process, you will need to enter a pattern (password) if it was previously registered, or create a new one. This will be an alternative means of unlocking the device if the scanner stops working. Then you will need to put your finger on the fingerprint scanner several times, and then your phone will be completely protected.
Please note that Zenithink Z102 allows you to add multiple prints by giving each one a name. This is done for the convenience of unlocking the device, depending on which finger is pressed to the fingerprint. This feature can be used if the device is used not only by you, but by another person as well.
Fingerprints in Individual Applications
If your smartphone is stolen, there is a high risk that the thief will gain access to the user's personal data, including bank accounts. This problem is especially relevant among people using online banking applications.
Fortunately, almost all of such apps allow you to additionally protect access to bank accounts. You just need to add a fingerprint on Zenithink Z102 through the settings, and then the scan will be automatically loaded into the application. You just need to confirm this login tool in the app settings.
If the App is not Protected by a Fingerprint
Usually, fingerprint protection is provided only for applications that interact with the user's money in some way. Apps like the Gallery and mobile games remain at risk. Fortunately, the Zenithink Z102 smartphone allows you to forcibly add protection for individual apps:
- Open your phone settings.
- Find the "Application lock" option (it may be called differently depending on the firmware version).
- Check the apps that you want to enforce protection on.
- Confirm the use of the fingerprint scanner in the settings.
Now, when trying to launch even the most innocuous program, an attacker will fail, since Zenithink Z102 will require them to provide a fingerprint.
Why Fingerprints do not Work on Zenithink Z102
Sometimes the advanced protection fails and the user cannot unlock their Zenithink Z102 because the device does not recognize the phone owner's fingerprint. This can happen for several reasons:
- the person puts the wrong finger to the scanner;
- the print was not pre-configured, or the settings were reset;
- the user applies a wet or dirty finger;
- the fingerprint scanner is damaged or clogged.
An alternative method of authorization using a password or a pattern key can help you get out of this situation. But how do you get the scanner to work again? First you need to check the cleanliness of your fingers and the fingerprint scanner itself. Next, you need to check for registered fingerprints and create a new one if necessary. If the cable connecting the scanner to the motherboard has not come off the Zenithink Z102, the problem should be resolved.
Share this page with your friends:See also:
How to flash Zenithink Z102
How to root Zenithink Z102
Hard reset for Zenithink Z102
How to reboot Zenithink Z102
How to unlock Zenithink Z102
What to do if Zenithink Z102 won't turn on
What to do if Zenithink Z102 doesn't charge
What to do if Zenithink Z102 doesn't connect to PC via USB
How to take a screenshot on Zenithink Z102
How to reset FRP on Zenithink Z102
How to call recording on Zenithink Z102
How to update Zenithink Z102
How to connect Zenithink Z102 to TV
How to clear the cache on Zenithink Z102
How to backup Zenithink Z102
How to disable ads on Zenithink Z102
How to clear storage on Zenithink Z102
How to increase font on Zenithink Z102
How to share internet on Zenithink Z102
How to transfer data to Zenithink Z102
How to unlock bootloader on Zenithink Z102
How to recover photos on Zenithink Z102
How to record the screen on Zenithink Z102
How to find blacklist in Zenithink Z102
How to block number on Zenithink Z102
How to enable auto-rotate on Zenithink Z102
How to set up or turn off an alarm on Zenithink Z102
How to change ringtone on Zenithink Z102
How to enable battery percentage on Zenithink Z102
How to turn off notifications on Zenithink Z102
How to turn off Google assistant on Zenithink Z102
How to turn off the lock screen on Zenithink Z102
How to delete app on Zenithink Z102
How to recover contacts on Zenithink Z102
Where is the recycle bin on Zenithink Z102
How to install WhatsApp on Zenithink Z102
How to set contact photo in Zenithink Z102
How to scan QR code on Zenithink Z102
How to connect Zenithink Z102 to computer
How to install SD card in Zenithink Z102
How to update Play Store in Zenithink Z102
How to install Google Camera in Zenithink Z102
How to enable USB debugging on Zenithink Z102
How to turn off Zenithink Z102
How to charge Zenithink Z102
How to use the camera on Zenithink Z102
How to find lost Zenithink Z102
How to set password on Zenithink Z102
How to turn on 5g on Zenithink Z102
How to turn on VPN on Zenithink Z102
How to install apps on Zenithink Z102
How to insert a SIM card in Zenithink Z102
How to enable and configure NFC on Zenithink Z102
How to set time on Zenithink Z102
How to connect headphones to Zenithink Z102
How to clear browser history on Zenithink Z102
How to disassemble Zenithink Z102
How to hide an app on Zenithink Z102
How to download YouTube videos on Zenithink Z102
How to unblock a contact on Zenithink Z102
How to turn on the flashlight on Zenithink Z102
How to split the screen on Zenithink Z102
How to turn off the camera sound on Zenithink Z102
How to trim video on Zenithink Z102
How to check RAM in Zenithink Z102
How to bypass the Google account on Zenithink Z102
How to fix black screen on Zenithink Z102
How to change the language on Zenithink Z102
How to open engineering mode in Zenithink Z102
How to open recovery mode in Zenithink Z102
How to find and turn on a voice recorder on Zenithink Z102
How to make video calls on Zenithink Z102
Zenithink Z102 sim card not detected
How to transfer contacts to Zenithink Z102
How to enable/disable «Do not disturb» mode on Zenithink Z102
How to enable/disable answerphone on Zenithink Z102
How to set up face recognition on Zenithink Z102
How to set up voicemail on Zenithink Z102
How to listen to voicemail on Zenithink Z102
How to check the IMEI number in Zenithink Z102
How to turn on fast charging on Zenithink Z102
How to replace the battery on Zenithink Z102
How to update the application on Zenithink Z102
Why the Zenithink Z102 discharges quickly
How to set a password for apps in the Zenithink Z102
How to format Zenithink Z102
How to install TWRP on Zenithink Z102
How to set up call forwarding on Zenithink Z102
How to empty the recycle bin on Zenithink Z102
Where to find the clipboard on Zenithink Z102
How to Set Up Fingerprint on Another Phones
