How to Bypass the Google Account on the Samsung Nexus S GT-I9023
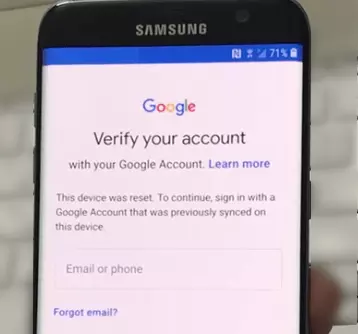
For Android devices, linking to a Google account is required to authorise the user. This is the FRP (Factory Reset Protection) function. You need it both to protect your data from unauthorised hands and to transfer your information to new devices using your Google account.
If you don't authorise it, you won't be able to use your phone. Or will it work? Many people are uncomfortable depending on the services of a company that gives data to black markets. Of course, crafters have long wondered how to bypass the Google account on the Samsung Nexus S GT-I9023, and the way exists, of course.
A safe but risky way
First of all, bypassing the FRP is still a violation of the phone's terms of use. The warranty is definitely expired and you have to take full responsibility for it. In addition, you have to use third-party software. Again, you are responsible.
Let's be clear right away. You can now no longer log in to your Google account. This bypasses the FRP lockout so you can enter new account details. To bypass a Google account, all kinds of apps on smartphones via computer do not work. They are all paid (surprise surprise) and are designed for a one-time purchase. Any of these apps will give you an error. And if you are unlucky, it will also clog up your device.
So now the algorithm for action:
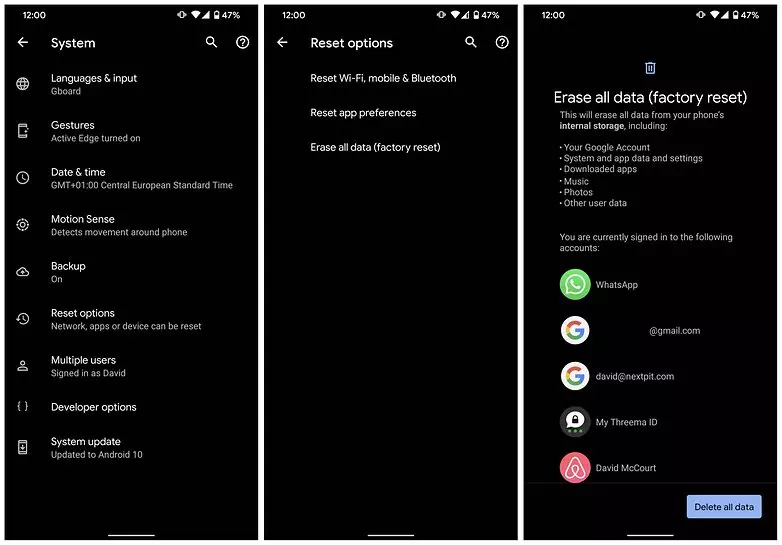
- Reset the phone to factory settings.
- Go to the settings.
- Go to "Restore and reset".
- Select "Reset settings".
- Find out about the risks of deleting all data from the internal memory and press " Reset mobile phone settings ".
- On the web page asking for a language, find an empty field and press it with two fingers.
- The loud voice assistant is activated - at this stage you cannot turn it off or reduce the volume.
- Swipe from top to bottom and to the right (at a 90 degree angle).
- The voice assistant settings menu opens.
- Select the Language setting option.
- Click on the settings icon in the shape of a star.
- Look for the item that describes the licences and open it.
- Under this item you will see a list of licences and their description in text format. We are not interested in the latter - it is just text. But we need the names of the licences - click on one of them. Then - on the magnifying glass icon.
- A search will open. Type in the internet and click on "Search".
- You will be offered to open any pre-installed browser. This is the browser you need to open.
- In the search box, type https://www.nckreader.com/samlock/.
- You will see many download links.
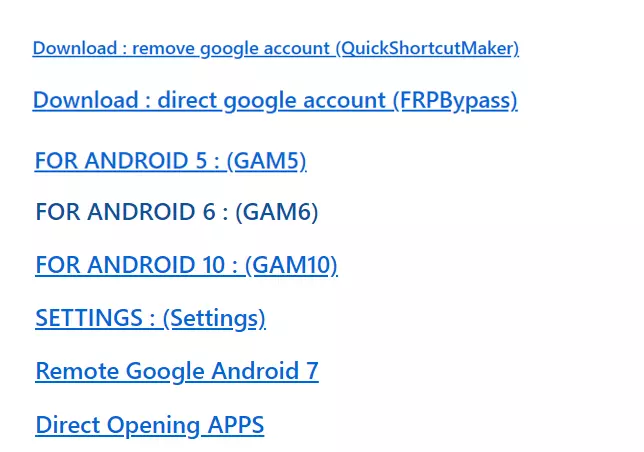
- We are interested in "Direct google account (FRPBypass)" and one of the links corresponding to the Android version of the phone.
- Then open the "Downloads" menu in the browser itself.
- Click on the file "frplock...".
- We will be prompted to allow installation from third party sources. Allow it.
- Once we have installed "frplock", start it immediately.
- Wait until a notification appears that the service has been stopped.
- Then install "Google-account..." and run it.
- Then run "frplock" again.
- That's it, congratulations, you have bypassed the FRP lock. Your phone is unlocked - you can now enter your new account details.
IMPORTANT! When you reset the phone to the factory settings, the FRP lock is active. You must bypass it in the same way.
Share this page with your friends:See also:
How to flash Samsung Nexus S GT-I9023
How to root Samsung Nexus S GT-I9023
Hard reset for Samsung Nexus S GT-I9023
How to reboot Samsung Nexus S GT-I9023
How to unlock Samsung Nexus S GT-I9023
What to do if Samsung Nexus S GT-I9023 won't turn on
What to do if Samsung Nexus S GT-I9023 doesn't charge
What to do if Samsung Nexus S GT-I9023 doesn't connect to PC via USB
How to take a screenshot on Samsung Nexus S GT-I9023
How to reset FRP on Samsung Nexus S GT-I9023
How to call recording on Samsung Nexus S GT-I9023
How to update Samsung Nexus S GT-I9023
How to connect Samsung Nexus S GT-I9023 to TV
How to clear the cache on Samsung Nexus S GT-I9023
How to backup Samsung Nexus S GT-I9023
How to disable ads on Samsung Nexus S GT-I9023
How to clear storage on Samsung Nexus S GT-I9023
How to increase font on Samsung Nexus S GT-I9023
How to share internet on Samsung Nexus S GT-I9023
How to transfer data to Samsung Nexus S GT-I9023
How to unlock bootloader on Samsung Nexus S GT-I9023
How to recover photos on Samsung Nexus S GT-I9023
How to record the screen on Samsung Nexus S GT-I9023
How to find blacklist in Samsung Nexus S GT-I9023
How to set up fingerprint on Samsung Nexus S GT-I9023
How to block number on Samsung Nexus S GT-I9023
How to enable auto-rotate on Samsung Nexus S GT-I9023
How to set up or turn off an alarm on Samsung Nexus S GT-I9023
How to change ringtone on Samsung Nexus S GT-I9023
How to enable battery percentage on Samsung Nexus S GT-I9023
How to turn off notifications on Samsung Nexus S GT-I9023
How to turn off Google assistant on Samsung Nexus S GT-I9023
How to turn off the lock screen on Samsung Nexus S GT-I9023
How to delete app on Samsung Nexus S GT-I9023
How to recover contacts on Samsung Nexus S GT-I9023
Where is the recycle bin on Samsung Nexus S GT-I9023
How to install WhatsApp on Samsung Nexus S GT-I9023
How to set contact photo in Samsung Nexus S GT-I9023
How to scan QR code on Samsung Nexus S GT-I9023
How to connect Samsung Nexus S GT-I9023 to computer
How to install SD card in Samsung Nexus S GT-I9023
How to update Play Store in Samsung Nexus S GT-I9023
How to install Google Camera in Samsung Nexus S GT-I9023
How to enable USB debugging on Samsung Nexus S GT-I9023
How to turn off Samsung Nexus S GT-I9023
How to charge Samsung Nexus S GT-I9023
How to use the camera on Samsung Nexus S GT-I9023
How to find lost Samsung Nexus S GT-I9023
How to set password on Samsung Nexus S GT-I9023
How to turn on 5g on Samsung Nexus S GT-I9023
How to turn on VPN on Samsung Nexus S GT-I9023
How to install apps on Samsung Nexus S GT-I9023
How to insert a SIM card in Samsung Nexus S GT-I9023
How to enable and configure NFC on Samsung Nexus S GT-I9023
How to set time on Samsung Nexus S GT-I9023
How to connect headphones to Samsung Nexus S GT-I9023
How to clear browser history on Samsung Nexus S GT-I9023
How to disassemble Samsung Nexus S GT-I9023
How to hide an app on Samsung Nexus S GT-I9023
How to download YouTube videos on Samsung Nexus S GT-I9023
How to unblock a contact on Samsung Nexus S GT-I9023
How to turn on the flashlight on Samsung Nexus S GT-I9023
How to split the screen on Samsung Nexus S GT-I9023
How to turn off the camera sound on Samsung Nexus S GT-I9023
How to trim video on Samsung Nexus S GT-I9023
How to fix black screen on Samsung Nexus S GT-I9023
How to change the language on Samsung Nexus S GT-I9023
How to open engineering mode in Samsung Nexus S GT-I9023
How to open recovery mode in Samsung Nexus S GT-I9023
How to find and turn on a voice recorder on Samsung Nexus S GT-I9023
How to make video calls on Samsung Nexus S GT-I9023
Samsung Nexus S GT-I9023 sim card not detected
How to transfer contacts to Samsung Nexus S GT-I9023
How to enable/disable «Do not disturb» mode on Samsung Nexus S GT-I9023
How to enable/disable answerphone on Samsung Nexus S GT-I9023
How to set up face recognition on Samsung Nexus S GT-I9023
How to set up voicemail on Samsung Nexus S GT-I9023
How to listen to voicemail on Samsung Nexus S GT-I9023
How to check the IMEI number in Samsung Nexus S GT-I9023
How to turn on fast charging on Samsung Nexus S GT-I9023
How to replace the battery on Samsung Nexus S GT-I9023
How to update the application on Samsung Nexus S GT-I9023
Why the Samsung Nexus S GT-I9023 discharges quickly
How to set a password for apps in the Samsung Nexus S GT-I9023
How to format Samsung Nexus S GT-I9023
How to install TWRP on Samsung Nexus S GT-I9023
How to set up call forwarding on Samsung Nexus S GT-I9023
How to empty the recycle bin on Samsung Nexus S GT-I9023
Where to find the clipboard on Samsung Nexus S GT-I9023
How to Bypass the Google Account on Another Phones
