How to Split the Screen on Blackview Oscal Tiger 10
Every modern cell phone user at least once noticed a desire to use several applications at once. A typical example is watching videos on YouTube and simultaneous correspondence with a loved one or a friend. Many people are sure that this is impossible and it is necessary to choose one thing. But thanks to updates to the Android system, this has long been no longer the case. Split the screen on the Blackview Oscal Tiger 10 into two parts you can literally in a couple of finger clicks.
Displaying two applications on the screen Blackview Oscal Tiger 10: instruction #1
The first option is a clean split screen, which will make it as comfortable as possible to use two programs and change the size of their windows according to the height indicator. In order to use this feature, do the following:
- Open the first app you're interested in (Telegram, for example).

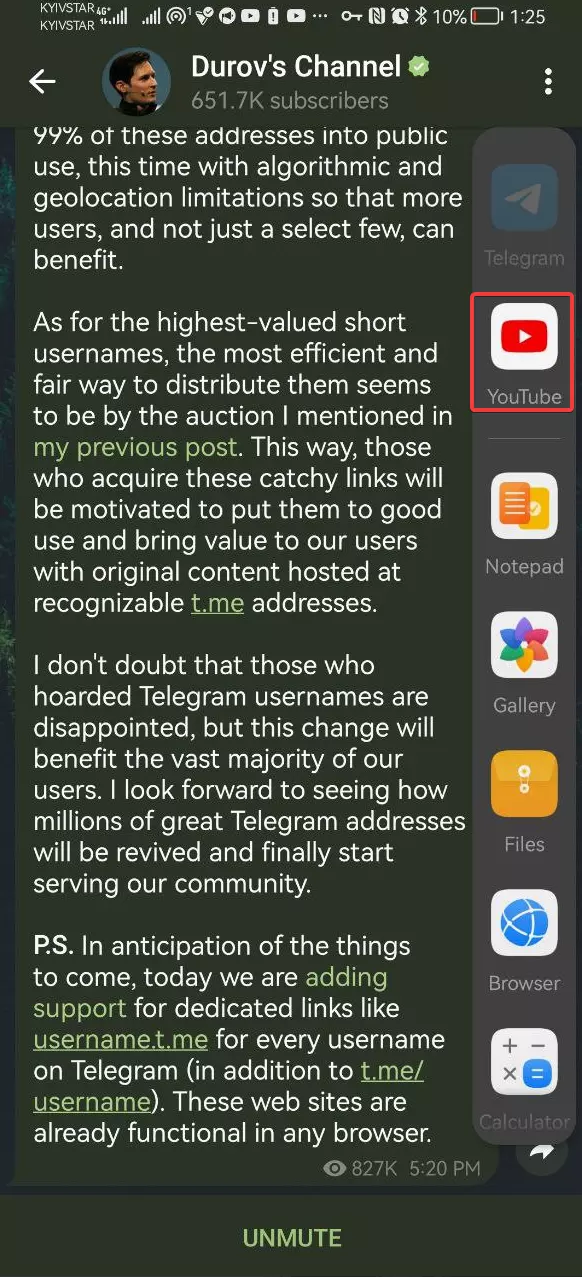
- Swipe from the right-most edge of the screen without releasing your finger until you see an icon with four squares (after this you will also see a long bar with the rest of your programs).

- Select the second app you want to use in split screen mode (e.g. YouTube) - hold your finger on its icon and don't release it.

- Without releasing the icon, move it a little to the left to the empty space - you can select the top of the screen relative to Telegram or move it to the bottom if you need YouTube playing at the bottom.

- Enjoy simultaneous chatting in Telegram and watching YouTube videos (or other simultaneous use of apps) - if necessary, you can drag the bar up and down between the two windows and make the window of one app longer vertically and the other shorter.

We hope that this option of setting up the two-window mode will help you.
Simultaneous display of two applications on the screen Blackview Oscal Tiger 10: instruction #2
If you are not interested in such a purely phone-tablet option of setting the split screen, you can use another option, which creates additional application windows on the example of computer applications. To do this:
- Repeat steps 1 and 2 of the previous setup option.
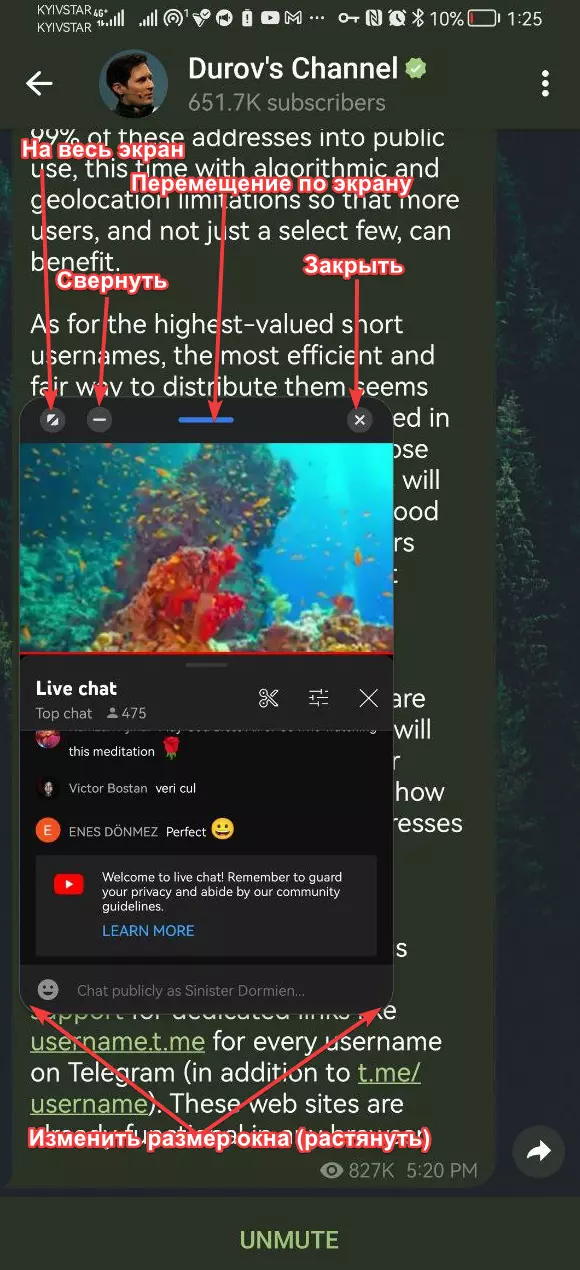
- Instead of clicking on the icon of the required second program, just click on its icon.

- An additional window will instantly appear on the screen, which will be located on top of the primary application and can be used in parallel.

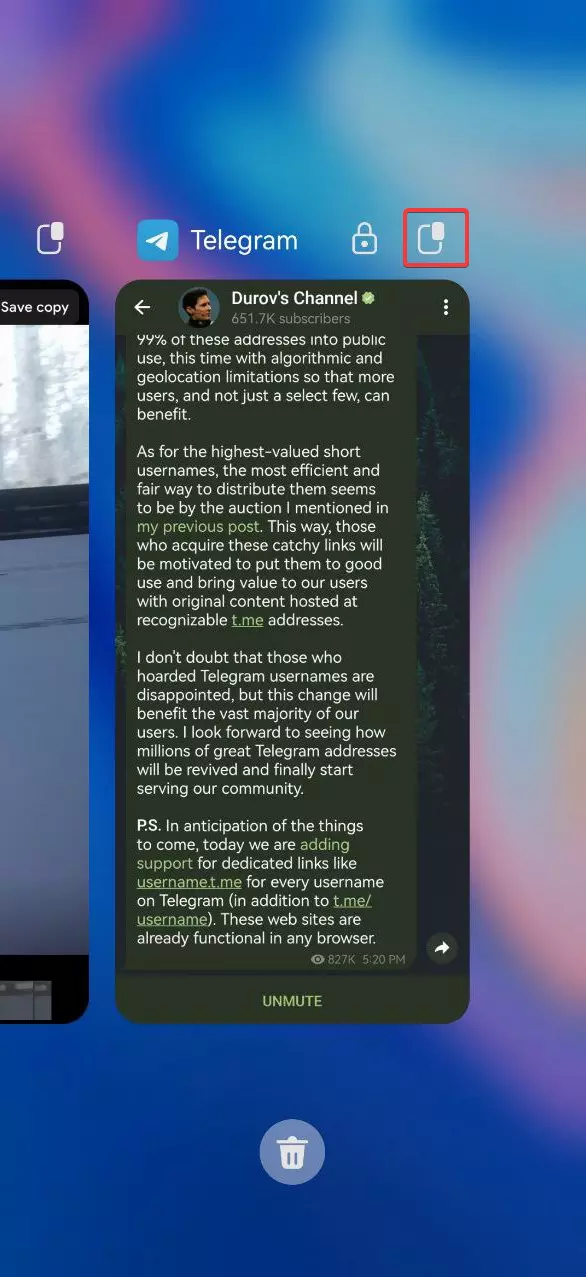
P.s. This window mode can also be started from the page of last running programs (swipe from the bottom of the screen up to the middle). There you just need to click on the corresponding icon near one of the last running applications.

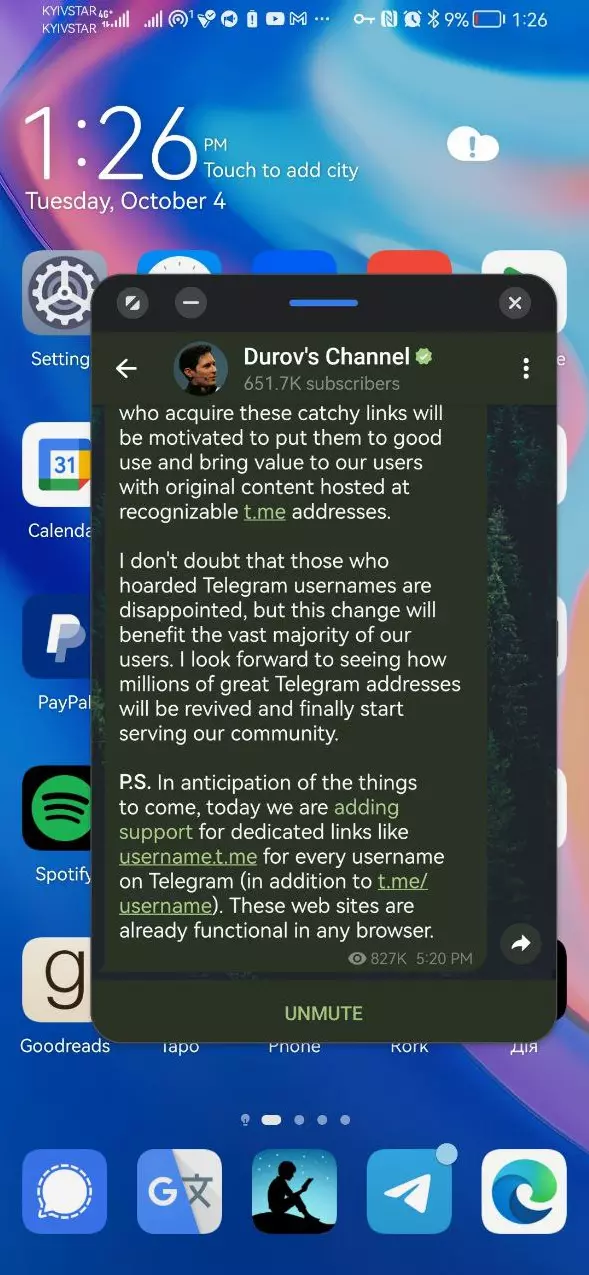
In this case, it will not even be necessary to select the first program. A new window will appear right on the home screen, after which you can go to the same Telegram or YouTube to implement your mode usage scenarios.
 Share this page with your friends:
 See also:
How to flash Blackview Oscal Tiger 10
How to root Blackview Oscal Tiger 10
Hard reset for Blackview Oscal Tiger 10
How to reboot Blackview Oscal Tiger 10
How to unlock Blackview Oscal Tiger 10
What to do if Blackview Oscal Tiger 10 won't turn on
What to do if Blackview Oscal Tiger 10 doesn't charge
What to do if Blackview Oscal Tiger 10 doesn't connect to PC via USB
How to take a screenshot on Blackview Oscal Tiger 10
How to reset FRP on Blackview Oscal Tiger 10
How to call recording on Blackview Oscal Tiger 10
How to update Blackview Oscal Tiger 10
How to connect Blackview Oscal Tiger 10 to TV
How to clear the cache on Blackview Oscal Tiger 10
How to backup Blackview Oscal Tiger 10
How to disable ads on Blackview Oscal Tiger 10
How to clear storage on Blackview Oscal Tiger 10
How to increase font on Blackview Oscal Tiger 10
How to share internet on Blackview Oscal Tiger 10
How to transfer data to Blackview Oscal Tiger 10
How to unlock bootloader on Blackview Oscal Tiger 10
How to recover photos on Blackview Oscal Tiger 10
How to record the screen on Blackview Oscal Tiger 10
How to find blacklist in Blackview Oscal Tiger 10
How to set up fingerprint on Blackview Oscal Tiger 10
How to block number on Blackview Oscal Tiger 10
How to enable auto-rotate on Blackview Oscal Tiger 10
How to set up or turn off an alarm on Blackview Oscal Tiger 10
How to change ringtone on Blackview Oscal Tiger 10
How to enable battery percentage on Blackview Oscal Tiger 10
How to turn off notifications on Blackview Oscal Tiger 10
How to turn off Google assistant on Blackview Oscal Tiger 10
How to turn off the lock screen on Blackview Oscal Tiger 10
How to delete app on Blackview Oscal Tiger 10
How to recover contacts on Blackview Oscal Tiger 10
Where is the recycle bin on Blackview Oscal Tiger 10
How to install WhatsApp on Blackview Oscal Tiger 10
How to set contact photo in Blackview Oscal Tiger 10
How to scan QR code on Blackview Oscal Tiger 10
How to connect Blackview Oscal Tiger 10 to computer
How to install SD card in Blackview Oscal Tiger 10
How to update Play Store in Blackview Oscal Tiger 10
How to install Google Camera in Blackview Oscal Tiger 10
How to enable USB debugging on Blackview Oscal Tiger 10
How to turn off Blackview Oscal Tiger 10
How to charge Blackview Oscal Tiger 10
How to use the camera on Blackview Oscal Tiger 10
How to find lost Blackview Oscal Tiger 10
How to set password on Blackview Oscal Tiger 10
How to turn on 5g on Blackview Oscal Tiger 10
How to turn on VPN on Blackview Oscal Tiger 10
How to install apps on Blackview Oscal Tiger 10
How to insert a SIM card in Blackview Oscal Tiger 10
How to enable and configure NFC on Blackview Oscal Tiger 10
How to set time on Blackview Oscal Tiger 10
How to connect headphones to Blackview Oscal Tiger 10
How to clear browser history on Blackview Oscal Tiger 10
How to disassemble Blackview Oscal Tiger 10
How to hide an app on Blackview Oscal Tiger 10
How to download YouTube videos on Blackview Oscal Tiger 10
How to unblock a contact on Blackview Oscal Tiger 10
How to turn on the flashlight on Blackview Oscal Tiger 10
How to turn off the camera sound on Blackview Oscal Tiger 10
How to trim video on Blackview Oscal Tiger 10
How to check RAM in Blackview Oscal Tiger 10
How to bypass the Google account on Blackview Oscal Tiger 10
How to fix black screen on Blackview Oscal Tiger 10
How to change the language on Blackview Oscal Tiger 10
How to open engineering mode in Blackview Oscal Tiger 10
How to open recovery mode in Blackview Oscal Tiger 10
How to find and turn on a voice recorder on Blackview Oscal Tiger 10
How to make video calls on Blackview Oscal Tiger 10
Blackview Oscal Tiger 10 sim card not detected
How to transfer contacts to Blackview Oscal Tiger 10
How to enable/disable «Do not disturb» mode on Blackview Oscal Tiger 10
How to enable/disable answerphone on Blackview Oscal Tiger 10
How to set up face recognition on Blackview Oscal Tiger 10
How to set up voicemail on Blackview Oscal Tiger 10
How to listen to voicemail on Blackview Oscal Tiger 10
How to check the IMEI number in Blackview Oscal Tiger 10
How to turn on fast charging on Blackview Oscal Tiger 10
How to replace the battery on Blackview Oscal Tiger 10
How to update the application on Blackview Oscal Tiger 10
Why the Blackview Oscal Tiger 10 discharges quickly
How to set a password for apps in the Blackview Oscal Tiger 10
How to format Blackview Oscal Tiger 10
How to install TWRP on Blackview Oscal Tiger 10
How to set up call forwarding on Blackview Oscal Tiger 10
How to empty the recycle bin on Blackview Oscal Tiger 10
Where to find the clipboard on Blackview Oscal Tiger 10
How to Split the Screen on Another Phones
