How to Open Recovery Mode in Micromax Q4151
Recovery is a recovery mode for Android-based smartphones. There are two recovery modes: factory mode (built-in) and software mode (via third-party software). This mode is useful when it is not possible to boot the phone using the normal boot process. For example, if the phone is infected with viruses, the update has errors in the operating system, or the firmware needs to be installed. Activating recovery mode in the Micromax Q4151 is quite simple, but you need to know the right combination of keys.
Other types of recovery
Recovery by the manufacturer cannot break anything. At most, the user will lose their data if they accidentally reset to factory defaults. However, problems can occur with modified versions.
There are two versions: Clockworkmod Recovery (CWM) and Team Win Recovery Project (TWRP). The functionality of both modes includes dangerous features - gaining root privileges, installing custom firmware and kernels.
There are useful and safe features in the modes, such as backing up and restoring from a previous backup. However, it is possible to perform these actions without a restore mod, so installing modified versions is simply not justified.
Of course, we don't want to discourage you from finding out for yourself, especially if you need root privileges or need to install custom firmware. However, we strongly advise you not to do this, as it will void your phone's warranty at the very least, and make it inoperable at the worst.
Normal start in recovery mode Micromax Q4151
First switch off the machine, as recovery mode can only be activated when the machine is switched on. You do not need to enter any codes, just press the correct combination of keys to activate the mode:
- Press the power button and the volume down button.
- Press the power key and the volume up key.
- Press the Power key and the Volume up and down keys.
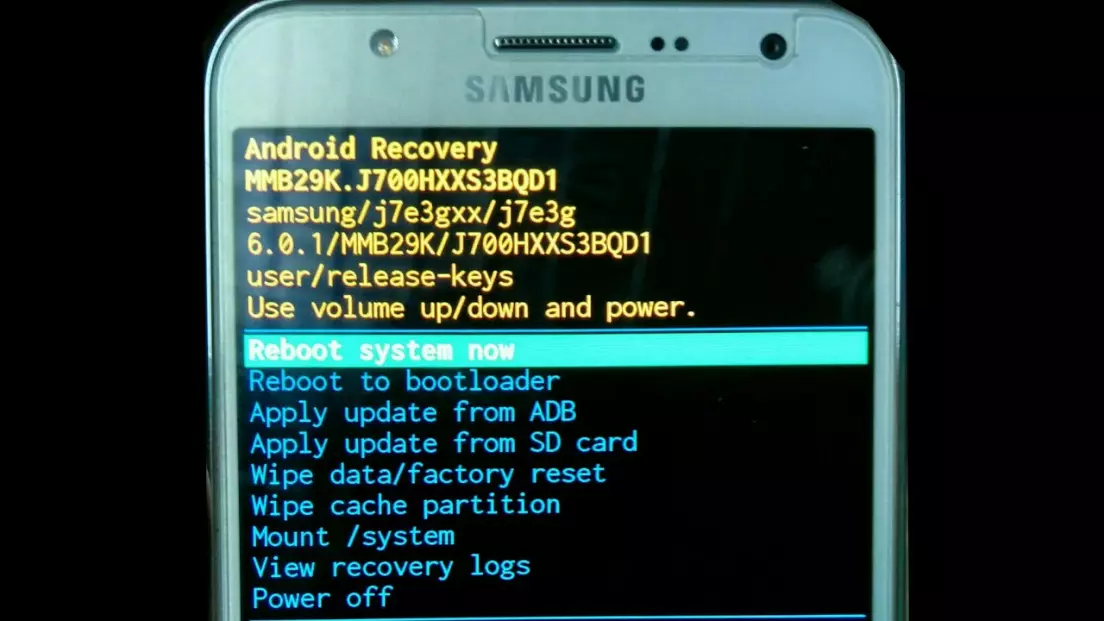
Recovery mode is operated using the Volume Down and Volume Up buttons. The power key has the function "OK" or "Select". All text is always in English, which is the main language of the Android interface.
Accessing recovery mode with ADB
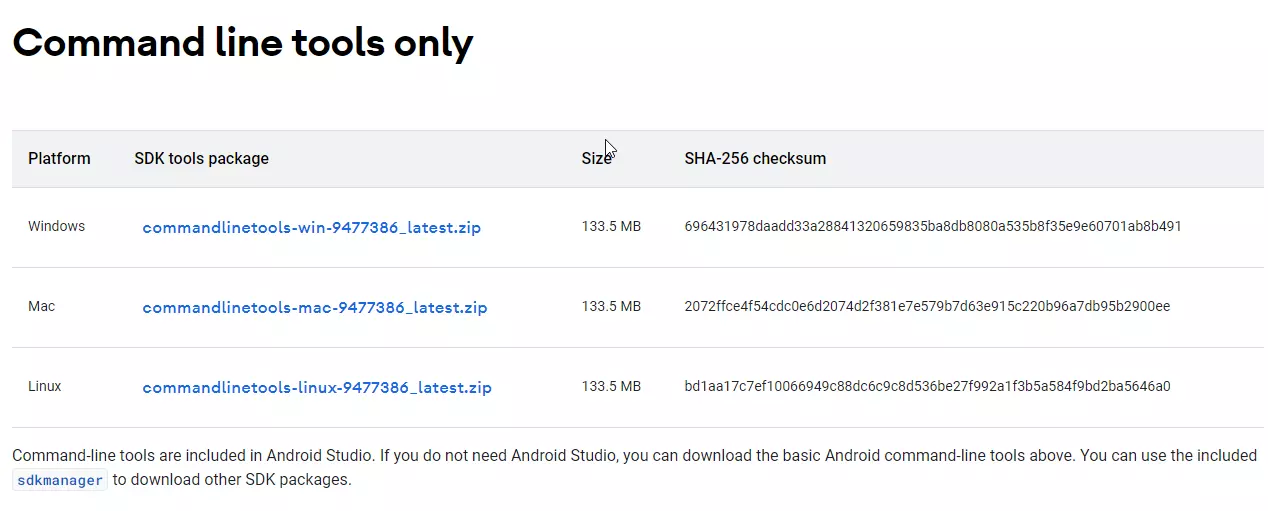
ADB - Android Debug Bridge. This is a standard command line extension that can be used to control a device connected to a computer. More specifically, it sends commands that are executed on the smartphone rather than the computer. Installing ADB is not easy, but you can either follow the instructions on the official Android Studio website or find a step-by-step guide online. The link to the official download page is https://developer.android.com/studio/index.html. On the website, go to the very bottom and look for "Command line tools only".
You will also need to install additional drivers. We recommend that you use the generic package that you can download from this link - https://adbdriver.com/downloads/. However, the manufacturers themselves also provide such drivers, but you will need to find them first. The phone must also be in debug mode for ADB to work.
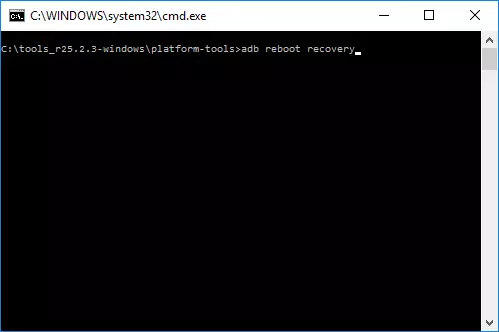
After installing any third-party software, simply open the console in administrator mode from the ADB utility folder and type "adb reboot recovery". The phone will automatically restart in reboot mode.
What's wrong with using software from third parties?
There is special software that allows you to start the recuperator with a single click. But this only takes up space, as the same action can be performed with two keystrokes. And using a terminal emulator, as many websites recommend, is pointless.
Instead of Recoup mode, an Android icon appears with an exclamation mark in a triangle and "No Commands".
The error can be corrected by pressing the power and volume buttons. Press once for a few seconds. The Recoup menu will open.
By the way, another common problem is that after rebooting, a message appears saying that there is no operating system and that fast boot mode has been started. This means that you have activated the fast boot function in this mode. To deactivate the mode, press and hold the power button for 10-15 seconds.
Share this page with your friends:See also:
How to flash Micromax Q4151
How to root Micromax Q4151
Hard reset for Micromax Q4151
How to reboot Micromax Q4151
How to unlock Micromax Q4151
What to do if Micromax Q4151 won't turn on
What to do if Micromax Q4151 doesn't charge
What to do if Micromax Q4151 doesn't connect to PC via USB
How to take a screenshot on Micromax Q4151
How to reset FRP on Micromax Q4151
How to call recording on Micromax Q4151
How to update Micromax Q4151
How to connect Micromax Q4151 to TV
How to clear the cache on Micromax Q4151
How to backup Micromax Q4151
How to disable ads on Micromax Q4151
How to clear storage on Micromax Q4151
How to increase font on Micromax Q4151
How to share internet on Micromax Q4151
How to transfer data to Micromax Q4151
How to unlock bootloader on Micromax Q4151
How to recover photos on Micromax Q4151
How to record the screen on Micromax Q4151
How to find blacklist in Micromax Q4151
How to set up fingerprint on Micromax Q4151
How to block number on Micromax Q4151
How to enable auto-rotate on Micromax Q4151
How to set up or turn off an alarm on Micromax Q4151
How to change ringtone on Micromax Q4151
How to enable battery percentage on Micromax Q4151
How to turn off notifications on Micromax Q4151
How to turn off Google assistant on Micromax Q4151
How to turn off the lock screen on Micromax Q4151
How to delete app on Micromax Q4151
How to recover contacts on Micromax Q4151
Where is the recycle bin on Micromax Q4151
How to install WhatsApp on Micromax Q4151
How to set contact photo in Micromax Q4151
How to scan QR code on Micromax Q4151
How to connect Micromax Q4151 to computer
How to install SD card in Micromax Q4151
How to update Play Store in Micromax Q4151
How to install Google Camera in Micromax Q4151
How to enable USB debugging on Micromax Q4151
How to turn off Micromax Q4151
How to charge Micromax Q4151
How to use the camera on Micromax Q4151
How to find lost Micromax Q4151
How to set password on Micromax Q4151
How to turn on 5g on Micromax Q4151
How to turn on VPN on Micromax Q4151
How to install apps on Micromax Q4151
How to insert a SIM card in Micromax Q4151
How to enable and configure NFC on Micromax Q4151
How to set time on Micromax Q4151
How to connect headphones to Micromax Q4151
How to clear browser history on Micromax Q4151
How to disassemble Micromax Q4151
How to hide an app on Micromax Q4151
How to download YouTube videos on Micromax Q4151
How to unblock a contact on Micromax Q4151
How to turn on the flashlight on Micromax Q4151
How to split the screen on Micromax Q4151
How to turn off the camera sound on Micromax Q4151
How to trim video on Micromax Q4151
How to bypass the Google account on Micromax Q4151
How to fix black screen on Micromax Q4151
How to change the language on Micromax Q4151
How to open engineering mode in Micromax Q4151
How to find and turn on a voice recorder on Micromax Q4151
How to make video calls on Micromax Q4151
Micromax Q4151 sim card not detected
How to transfer contacts to Micromax Q4151
How to enable/disable «Do not disturb» mode on Micromax Q4151
How to enable/disable answerphone on Micromax Q4151
How to set up face recognition on Micromax Q4151
How to set up voicemail on Micromax Q4151
How to listen to voicemail on Micromax Q4151
How to check the IMEI number in Micromax Q4151
How to turn on fast charging on Micromax Q4151
How to replace the battery on Micromax Q4151
How to update the application on Micromax Q4151
Why the Micromax Q4151 discharges quickly
How to set a password for apps in the Micromax Q4151
How to format Micromax Q4151
How to install TWRP on Micromax Q4151
How to set up call forwarding on Micromax Q4151
How to empty the recycle bin on Micromax Q4151
Where to find the clipboard on Micromax Q4151
How to Open Recovery Mode in Another Phones
