How to Connect DNS S5003 to TV
Modern technologies allow performing a variety of operations related to smartphones. Many of them simplify the process of interacting with the device and expand its functionality greatly. For example, you can connect DNS S5003 to TV. Why do you need such a connection and how do you set it up?
What are the Benefits of Connecting DNS S5003 to TV?
DNS S5003 is a full-fledged multimedia device that does not require synchronization with home appliances in standard use cases. But sometimes the smartphone needs to be connected to a TV in order to access the following features:
- watching videos on the big screen;
- listening to music through the TV speakers;
- gaming on the TV screen;
- display the smartphone home screen on TV;
- wireless TV control.
DNS S5003’s users can add a lot to that list of possible options themselves. But the fact remains that connecting a phone to a TV is a function incorporated by the developers into the DNS S5003.
You can use several synchronization methods to set up a connection between the two devices. Both wired and wireless options are available. The choice of a particular method depends on various reasons, including the technical equipment of the house, as well as the functionality of the TV. Therefore, it is recommended to consider all possible methods before performing the connection.
Wired Connection Options
Wired methods of connecting DNS S5003 to a TV are not the most convenient as they depend on the use of cables, but at the same time such options do not require advanced technical equipment of the TV.
Via USB
This is the easiest way to connect your phone to your TV screen. To set it up, the owner of DNS S5003 will need a USB cable that comes with the device.
Next, you need to insert one side of the cable into the smartphone, and the other into your TV. After that, you need to open the TV menu using the remote control and select the USB port in use in the connections menu.
At the same time, the exchange of data with the TV is confirmed on the smartphone itself, where you need to select the connection as a media device. If everything is done correctly, the TV will detect the DNS S5003 as an external storage, so you will be able to use the remote control to display photos, audio and video on the TV screen.
Via HDMI
This method is more complex, but more functional as well. If a USB connection offers users a basic set of capabilities, allowing the DNS S5003 to be used as an external storage, pairing via HDMI lets the smartphone home screen be displayed on the TV screen, as the actions performed on the phone will also be displayed. For example, the use of certain apps.
The difficulty of the method lies in the fact that DNS S5003 is not equipped with an HDMI port for connecting to a TV. But this drawback can be solved with the use of an MHL or SlimPort adapter. You can buy the corresponding accessory in an e-store for about $3.
The connection can be set up as follows:
- The USB plug from the MHL or SlimPort adapter is inserted into the smartphone.
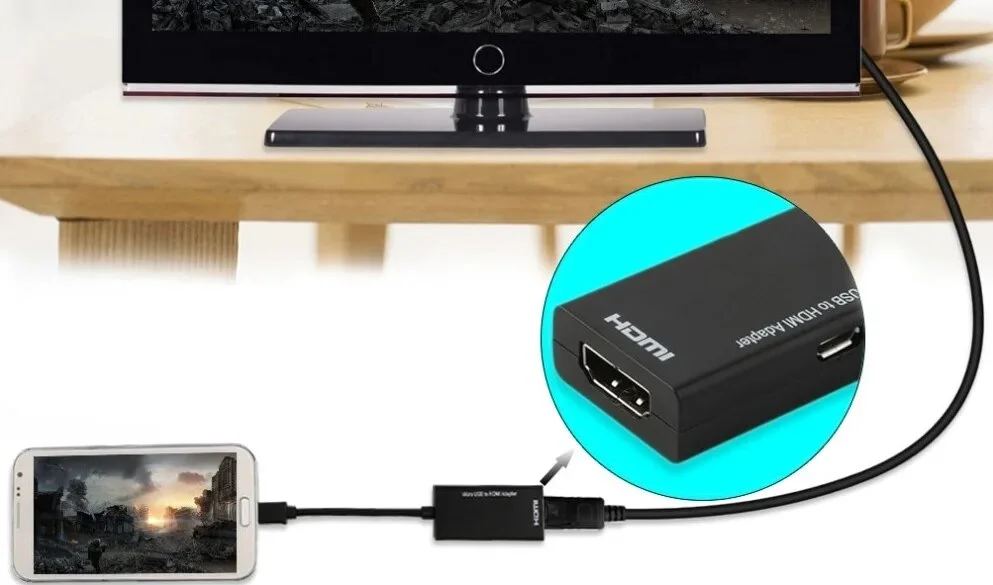
- The HDMI cable needs to connect the same parts of the adapter and receiver.
- The user needs to open TV settings and access the list of available connections.
- The HDMI connector used can then be selected.
If everything is done correctly, then the DNS S5003 home screen will be displayed on the TV. This lets you operate the smartphone, as your actions will be displayed on the TV screen.
Wireless Connection Options
Ways of setting up a connection between devices without using wires are the most convenient and popular. But in order to connect DNS S5003 to a TV wirelessly, the latter must support Smart TV technology. Otherwise, you will only be able to connect the devices using a cable.
Via Wi-Fi Direct
Wi-Fi Direct is a feature supported by most smart TV models. It allows you to display the image from the screen of DNS S5003 to the TV. To set up this connection, you need to:
- Activate Wi-Fi Direct in the Network section of the TV settings.
- On the phone, open the settings and go to the Wi-Fi section.
- Press the button with three dots on it and select Wi-Fi Direct.
- Select your TV receiver from the menu of available devices.
After performing these steps, you will need to open a file manager or gallery, select the required file, click the Share button and select Wi-Fi Direct as the sending method.
Via Miracast
Miracast is another wireless connection technology that has broader functionality compared to Wi-Fi Direct. For example, it is possible to display not only a separate file, but also all actions performed in the phone menu on the TV screen.
To set up this connection, you need to:
- Activate Miracast in TV settings.
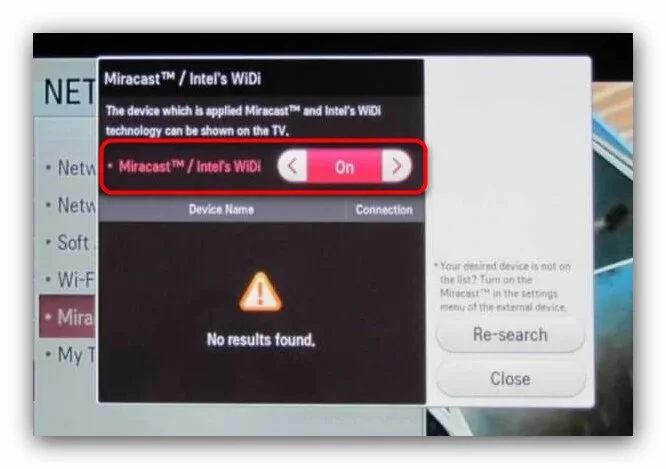
- On the phone, go to the Screen Mirroring or Wireless Display settings (the name of the section may differ depending on the firmware).
- Select your TV from the available devices.
Then the image from the smartphone screen will be transferred to the TV. Any action of the user, including the launch of individual games or apps, will be displayed on the big screen.
If you were not able to find the Miracast function in the TV settings of your Smart TV, do not worry. The technology is supported by all models with a built-in Wi-Fi module. You just need to connect the TV and the smartphone to the same Wi-Fi network, and then activate the wireless display in the settings of your DNS S5003.
You can also use third-party applications from Google Play to perform this operation. For example, you can use AirScreen or Screen Mirroring. There are a lot of similar apps, so finding the right one should not prove difficult.
Share this page with your friends:See also:
How to flash DNS S5003
How to root DNS S5003
Hard reset for DNS S5003
How to reboot DNS S5003
How to unlock DNS S5003
What to do if DNS S5003 won't turn on
What to do if DNS S5003 doesn't charge
What to do if DNS S5003 doesn't connect to PC via USB
How to take a screenshot on DNS S5003
How to reset FRP on DNS S5003
How to call recording on DNS S5003
How to update DNS S5003
How to clear the cache on DNS S5003
How to backup DNS S5003
How to disable ads on DNS S5003
How to clear storage on DNS S5003
How to increase font on DNS S5003
How to share internet on DNS S5003
How to transfer data to DNS S5003
How to unlock bootloader on DNS S5003
How to recover photos on DNS S5003
How to record the screen on DNS S5003
How to find blacklist in DNS S5003
How to set up fingerprint on DNS S5003
How to block number on DNS S5003
How to enable auto-rotate on DNS S5003
How to set up or turn off an alarm on DNS S5003
How to change ringtone on DNS S5003
How to enable battery percentage on DNS S5003
How to turn off notifications on DNS S5003
How to turn off Google assistant on DNS S5003
How to turn off the lock screen on DNS S5003
How to delete app on DNS S5003
How to recover contacts on DNS S5003
Where is the recycle bin on DNS S5003
How to install WhatsApp on DNS S5003
How to set contact photo in DNS S5003
How to scan QR code on DNS S5003
How to connect DNS S5003 to computer
How to install SD card in DNS S5003
How to update Play Store in DNS S5003
How to install Google Camera in DNS S5003
How to enable USB debugging on DNS S5003
How to turn off DNS S5003
How to charge DNS S5003
How to use the camera on DNS S5003
How to find lost DNS S5003
How to set password on DNS S5003
How to turn on 5g on DNS S5003
How to turn on VPN on DNS S5003
How to install apps on DNS S5003
How to insert a SIM card in DNS S5003
How to enable and configure NFC on DNS S5003
How to set time on DNS S5003
How to connect headphones to DNS S5003
How to clear browser history on DNS S5003
How to disassemble DNS S5003
How to hide an app on DNS S5003
How to download YouTube videos on DNS S5003
How to unblock a contact on DNS S5003
How to turn on the flashlight on DNS S5003
How to split the screen on DNS S5003
How to turn off the camera sound on DNS S5003
How to trim video on DNS S5003
How to check RAM in DNS S5003
How to bypass the Google account on DNS S5003
How to fix black screen on DNS S5003
How to change the language on DNS S5003
How to open engineering mode in DNS S5003
How to open recovery mode in DNS S5003
How to find and turn on a voice recorder on DNS S5003
How to make video calls on DNS S5003
DNS S5003 sim card not detected
How to transfer contacts to DNS S5003
How to enable/disable «Do not disturb» mode on DNS S5003
How to enable/disable answerphone on DNS S5003
How to set up face recognition on DNS S5003
How to set up voicemail on DNS S5003
How to listen to voicemail on DNS S5003
How to check the IMEI number in DNS S5003
How to turn on fast charging on DNS S5003
How to replace the battery on DNS S5003
How to update the application on DNS S5003
Why the DNS S5003 discharges quickly
How to set a password for apps in the DNS S5003
How to format DNS S5003
How to install TWRP on DNS S5003
How to set up call forwarding on DNS S5003
How to empty the recycle bin on DNS S5003
Where to find the clipboard on DNS S5003
How to Connect Another Phones to TV
