How to Install TWRP on LG G7 Plus ThinQ
TWRP — Team Win Recovery Project. In simple terms, this is a custom recovery or a program for restoring Android-based devices. Recovery refers to creating a full backup of all data, including the bootloader, user applications and settings, system data, and so on. The backup can be accessed at any time. It is worth installing TWRP on LG G7 Plus ThinQ only if you assume that you cannot restore the device in the standard way.
Note that some manufacturers embed TWRP into their operating systems by default. Moreover, this is legal, since TWRP — an open source program that anyone can use for free. Also, our editorial staff strongly recommends that you do not use the functions of overwriting the operating system without knowledge of the issue. If you delete Android from your device, you probably won't be able to restore it yourself.
Once again, the main and safe function — is to back up your data! There is no need to remove Android from your device and install another operating system!!! Don't click on the «Wipe» button just like that!!!!! Now we proceed directly to the installation.
About the official TWRP app and where to download it
If you have already studied the article on the topic, then you have come across a mention of the Official TWRP App. Only here's the problem, if you bought a phone a year or two ago, you won't be able to install it. Why? Yes, because on modern Android this application is not available, as it was developed for earlier versions of the OS.
So if you can't find the app in your Google Play, then:
- We strongly recommend that you abandon the idea of installing TWRP! Seriously, you can kill your phone, and we don't want to be responsible for it.
- If you are still persistent enough, then go to the official website — Official application TWRP — and download the «.apk» file.
- Also, carefully! CAREFULLY!!! Read this excerpt from the official website: «The initial version of the app does not support firmware on Pixel due to the Pixel's A/B sections. In addition, the app may not support searching and firmware images from external storage».
- Think again if you need TWRP at all (and aren't you afraid to kill your smartphone).
- If you have finally decided, then install TWRP by running the «.apk» file. If at this stage you encounter any error, then do not try to install the official application further, since your device does not support it.
What to do after installing the TWRP application
Now remains a small matter:
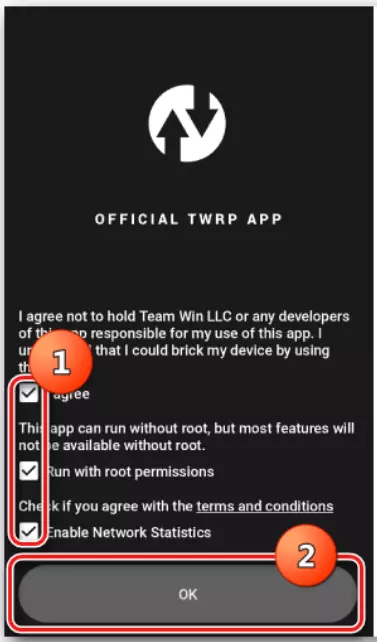
- Open the application. Carefully! CAREFULLY!!! We read all the warnings from Team Win and tick the boxes opposite the items confirming our desire to destroy our smartphone with our own hands.
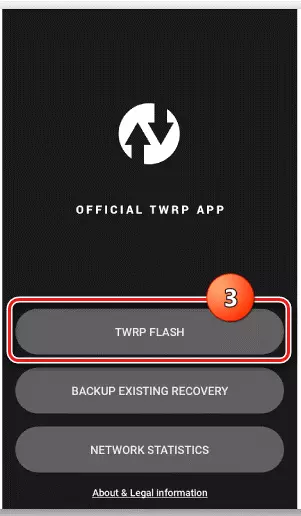
- Click on «TWRP FLASH».
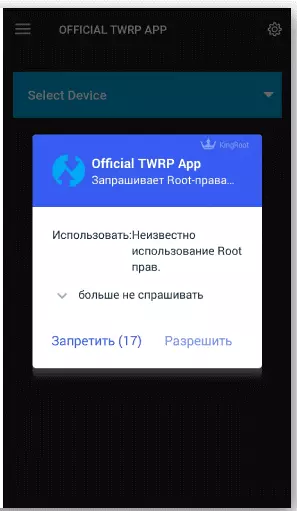
- A window will appear in which we will be asked to grant the application Root-rights. By the way, did we say that for the normal operation of the application, you will need superuser rights? If you don't have them, then read about the ways to get them in our other guide. And if you don't want to get Root-rights, then close this article, because nothing will work without them.
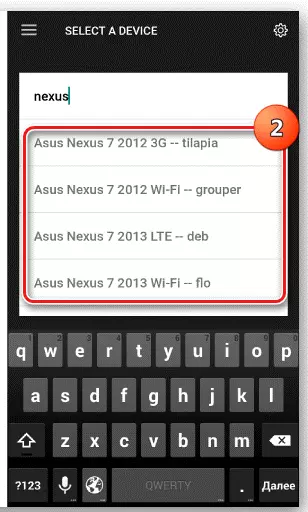
- Next, click on «Select Device». In the list that opens, you need to find your smartphone. If it is not there, then you will not be able to install TWRP, since Team Win has not yet added support for your model!
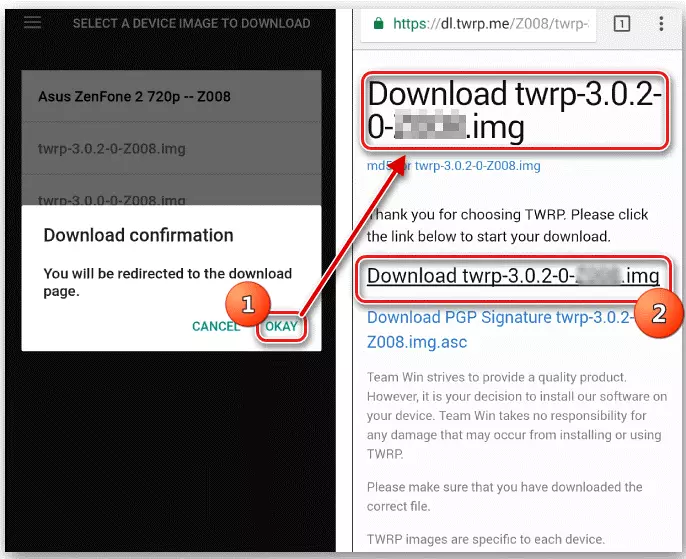
- If you find your smartphone, then immediately after selecting it, the application will automatically redirect you to a website from which you can download an image of the modified environment. Actually, we need to download this file. It must have the extension «.img»!
- After downloading the file, open the application again and click on «Select a file to flash..». A menu opens where you need to find the downloaded «.img».
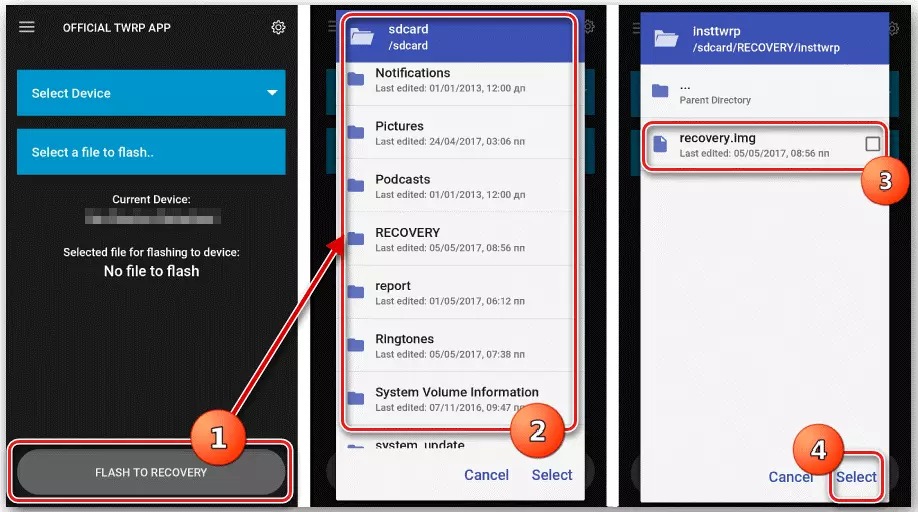
- Next, click on «FLASH TO RECOVERY». And we confirm our intention.
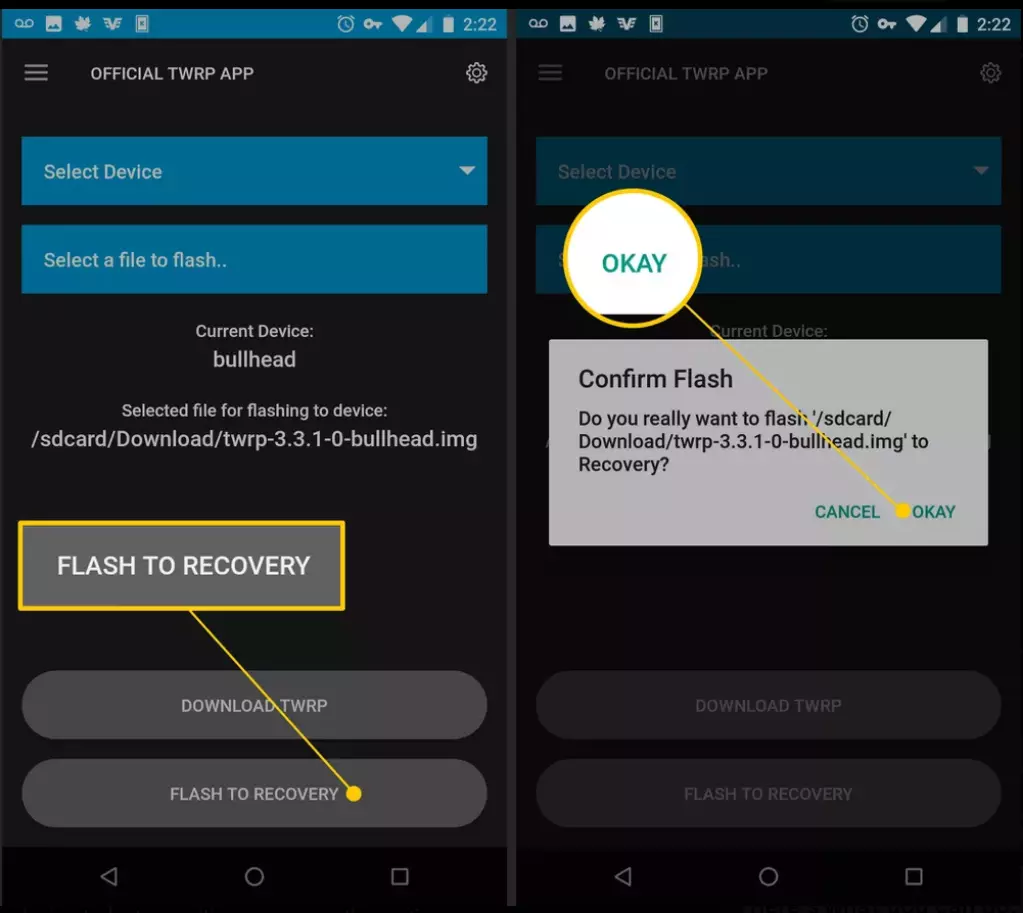
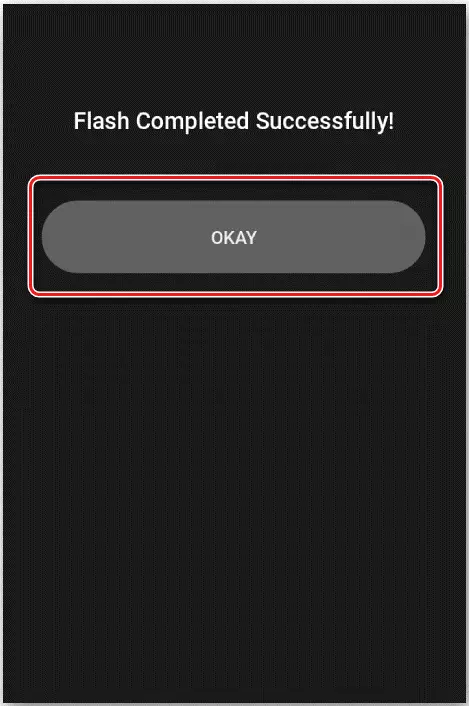
- After a short period of time, you will receive a message «Flash Completed Successfully!». We congratulate you, too, you got your hands on a tool to mock your smartphone!
See also:
How to flash LG G7 Plus ThinQ
How to root LG G7 Plus ThinQ
Hard reset for LG G7 Plus ThinQ
How to reboot LG G7 Plus ThinQ
How to unlock LG G7 Plus ThinQ
What to do if LG G7 Plus ThinQ won't turn on
What to do if LG G7 Plus ThinQ doesn't charge
What to do if LG G7 Plus ThinQ doesn't connect to PC via USB
How to take a screenshot on LG G7 Plus ThinQ
How to reset FRP on LG G7 Plus ThinQ
How to call recording on LG G7 Plus ThinQ
How to update LG G7 Plus ThinQ
How to connect LG G7 Plus ThinQ to TV
How to clear the cache on LG G7 Plus ThinQ
How to backup LG G7 Plus ThinQ
How to disable ads on LG G7 Plus ThinQ
How to clear storage on LG G7 Plus ThinQ
How to increase font on LG G7 Plus ThinQ
How to share internet on LG G7 Plus ThinQ
How to transfer data to LG G7 Plus ThinQ
How to unlock bootloader on LG G7 Plus ThinQ
How to recover photos on LG G7 Plus ThinQ
How to record the screen on LG G7 Plus ThinQ
How to find blacklist in LG G7 Plus ThinQ
How to set up fingerprint on LG G7 Plus ThinQ
How to block number on LG G7 Plus ThinQ
How to enable auto-rotate on LG G7 Plus ThinQ
How to set up or turn off an alarm on LG G7 Plus ThinQ
How to change ringtone on LG G7 Plus ThinQ
How to enable battery percentage on LG G7 Plus ThinQ
How to turn off notifications on LG G7 Plus ThinQ
How to turn off Google assistant on LG G7 Plus ThinQ
How to turn off the lock screen on LG G7 Plus ThinQ
How to delete app on LG G7 Plus ThinQ
How to recover contacts on LG G7 Plus ThinQ
Where is the recycle bin on LG G7 Plus ThinQ
How to install WhatsApp on LG G7 Plus ThinQ
How to set contact photo in LG G7 Plus ThinQ
How to scan QR code on LG G7 Plus ThinQ
How to connect LG G7 Plus ThinQ to computer
How to install SD card in LG G7 Plus ThinQ
How to update Play Store in LG G7 Plus ThinQ
How to install Google Camera in LG G7 Plus ThinQ
How to enable USB debugging on LG G7 Plus ThinQ
How to turn off LG G7 Plus ThinQ
How to charge LG G7 Plus ThinQ
How to use the camera on LG G7 Plus ThinQ
How to find lost LG G7 Plus ThinQ
How to set password on LG G7 Plus ThinQ
How to turn on 5g on LG G7 Plus ThinQ
How to turn on VPN on LG G7 Plus ThinQ
How to install apps on LG G7 Plus ThinQ
How to insert a SIM card in LG G7 Plus ThinQ
How to enable and configure NFC on LG G7 Plus ThinQ
How to set time on LG G7 Plus ThinQ
How to connect headphones to LG G7 Plus ThinQ
How to clear browser history on LG G7 Plus ThinQ
How to disassemble LG G7 Plus ThinQ
How to hide an app on LG G7 Plus ThinQ
How to download YouTube videos on LG G7 Plus ThinQ
How to unblock a contact on LG G7 Plus ThinQ
How to turn on the flashlight on LG G7 Plus ThinQ
How to split the screen on LG G7 Plus ThinQ
How to turn off the camera sound on LG G7 Plus ThinQ
How to trim video on LG G7 Plus ThinQ
How to bypass the Google account on LG G7 Plus ThinQ
How to fix black screen on LG G7 Plus ThinQ
How to change the language on LG G7 Plus ThinQ
How to open engineering mode in LG G7 Plus ThinQ
How to open recovery mode in LG G7 Plus ThinQ
How to find and turn on a voice recorder on LG G7 Plus ThinQ
How to make video calls on LG G7 Plus ThinQ
LG G7 Plus ThinQ sim card not detected
How to transfer contacts to LG G7 Plus ThinQ
How to enable/disable «Do not disturb» mode on LG G7 Plus ThinQ
How to enable/disable answerphone on LG G7 Plus ThinQ
How to set up face recognition on LG G7 Plus ThinQ
How to set up voicemail on LG G7 Plus ThinQ
How to listen to voicemail on LG G7 Plus ThinQ
How to check the IMEI number in LG G7 Plus ThinQ
How to turn on fast charging on LG G7 Plus ThinQ
How to replace the battery on LG G7 Plus ThinQ
How to update the application on LG G7 Plus ThinQ
Why the LG G7 Plus ThinQ discharges quickly
How to set a password for apps in the LG G7 Plus ThinQ
How to format LG G7 Plus ThinQ
How to set up call forwarding on LG G7 Plus ThinQ
How to empty the recycle bin on LG G7 Plus ThinQ
Where to find the clipboard on LG G7 Plus ThinQ
How to Install TWRP on Another Phones
