How to Enable USB Debugging on Assistant AP-717G

By connecting the smartphone to the PC via USB cable, the user can charge the gadget or transfer files, for example. To extend the pairing possibilities, you need to enable USB debugging on the Assistant AP-717G. This will allow access to additional operations when the phone and the PC are communicating.
Why USB debugging is needed
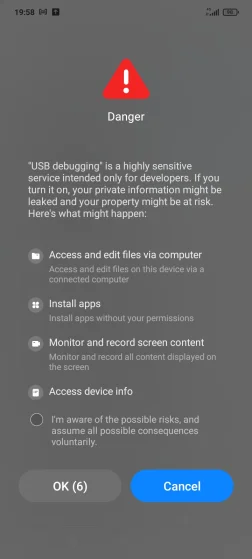
Debugging is most often used by mobile app developers, as it gives access not only to the files stored on the smartphone, but also to the internals of the mobile platform. However, this mode is also used by ordinary users.
In particular, it allows you to flash your smartphone via a computer if the operation cannot be performed using standard means. Also, debugging allows you to connect to a PC without warning. That is, when pairing devices in this mode, no notification will appear on the smartphone screen asking you to select a connection mode ("Charge only" or "File transfer").
Standard activation method
Every Android smartphone, including the Assistant AP-717G, allows you to activate debug mode. But by default this option is hidden, so the activation takes place in two steps.
№1. Switching to developer mode
Debugging is enabled via Developer mode, which is initially hidden. Consequently, the first thing we need to do is to activate the advanced options menu:
- Open the phone settings.
- Go to "About phone".
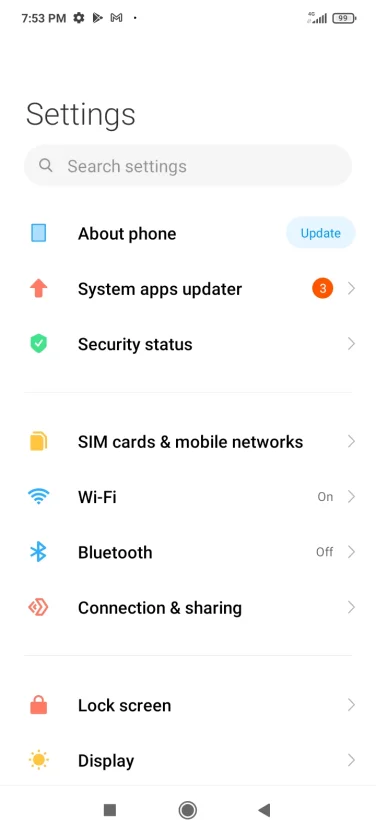
- Click 5 times on the build number or MIUI version.
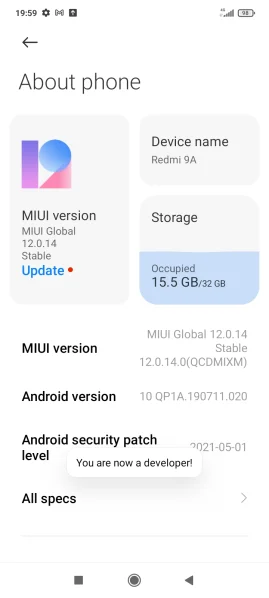
The message "You are now a developer" will appear to indicate that you have activated the missing option. You can then move on to the process of activating debugging itself.
№2. Enabling debugging
Having completed the preparatory steps, move on to the main part of the instructions, which look as follows:
- Open the Assistant AP-717G settings.
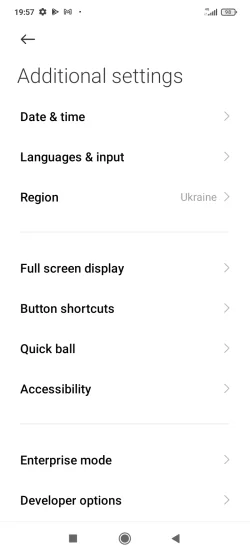
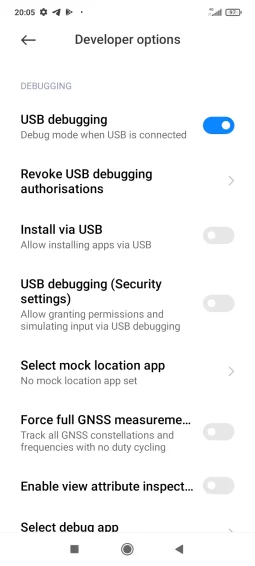
- Go to "Additional settings" and then to "Developer options".
- Activate the slider next to "USB debugging".
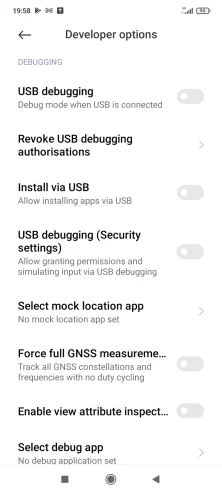
- Confirm the operation.
This completes enabling the option, and you can communicate with the smartphone via the computer in debug mode.
How to enable USB debugging on Assistant AP-717G with broken screen
Previously mentioned, the mode in question allows you to connect your phone to a PC without giving permission for file transfer. Therefore, this option is often seen as a means of exchanging data between a PC and a faulty smartphone. However, it can be difficult to activate the mode itself.
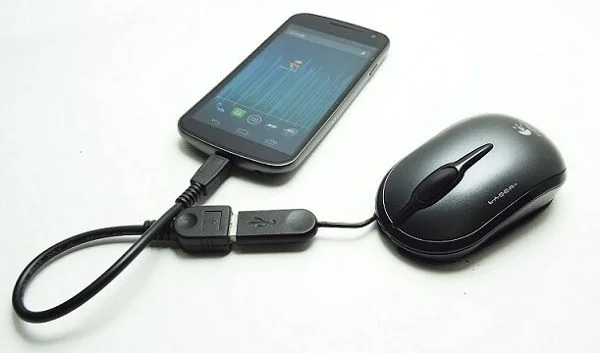
To enable USB debugging on the Assistant AP-717G if the screen is broken, you can use optional accessories:
- Insert the OTG adaptor into your phone.
- Connect your computer mouse to it.
- Follow the steps described in the previous instructions with the accessory connected.
This option will help to activate the option in a situation where only the touch screen layer does not work and the information on the matrix remains readable. Otherwise, you will have to proceed at random.
How to enable USB debugging when the Assistant AP-717G is locked
The principle of activating mode on a locked phone is slightly different. In this case, you cannot access the home screen or settings. You can only bypass the restrictions by first resetting the settings via the recovery. Hence, to enable USB debugging on the Assistant AP-717G if the phone is locked, you need to:
- Switch off your smartphone.
- Press the power button and lower volume knob (you can also try another combination, e.g. "Volume Up" + "Power").
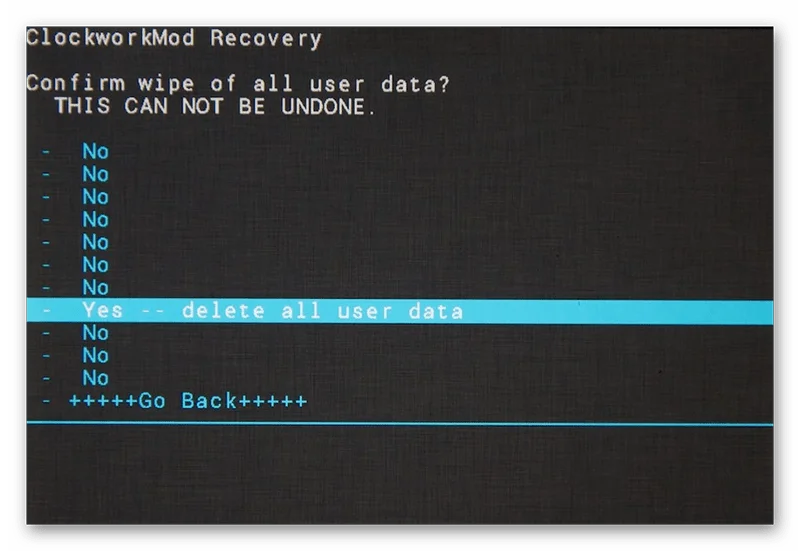
- Go to "Wipe data/factory reset" after the Recovery menu appears (use the volume knob to move and the power key to confirm the move).
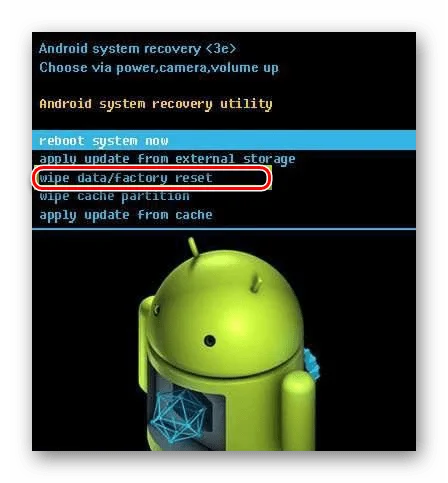
- Confirm the wipe-down.
- Go back to the main menu and confirm the "Reboot system now" operation.
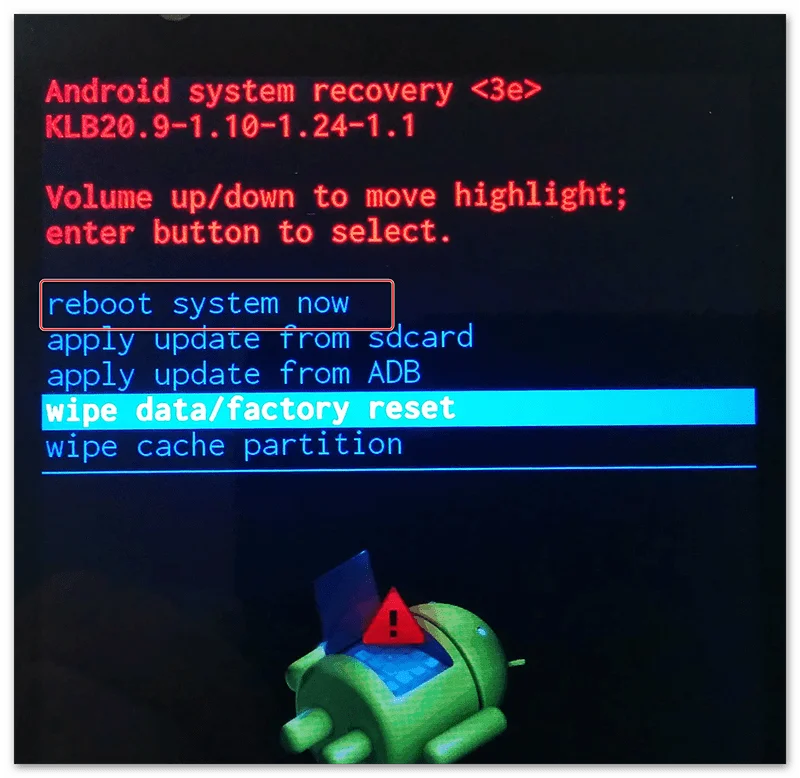
After a reboot, the Assistant AP-717G will turn on unlocked and you can activate debugging via the settings menu. However, after resetting via the recovery, all files will be deleted.
Share this page with your friends:See also:
How to flash Assistant AP-717G
How to root Assistant AP-717G
Hard reset for Assistant AP-717G
How to reboot Assistant AP-717G
How to unlock Assistant AP-717G
What to do if Assistant AP-717G won't turn on
What to do if Assistant AP-717G doesn't charge
What to do if Assistant AP-717G doesn't connect to PC via USB
How to take a screenshot on Assistant AP-717G
How to reset FRP on Assistant AP-717G
How to call recording on Assistant AP-717G
How to update Assistant AP-717G
How to connect Assistant AP-717G to TV
How to clear the cache on Assistant AP-717G
How to backup Assistant AP-717G
How to disable ads on Assistant AP-717G
How to clear storage on Assistant AP-717G
How to increase font on Assistant AP-717G
How to share internet on Assistant AP-717G
How to transfer data to Assistant AP-717G
How to unlock bootloader on Assistant AP-717G
How to recover photos on Assistant AP-717G
How to record the screen on Assistant AP-717G
How to find blacklist in Assistant AP-717G
How to set up fingerprint on Assistant AP-717G
How to block number on Assistant AP-717G
How to enable auto-rotate on Assistant AP-717G
How to set up or turn off an alarm on Assistant AP-717G
How to change ringtone on Assistant AP-717G
How to enable battery percentage on Assistant AP-717G
How to turn off notifications on Assistant AP-717G
How to turn off Google assistant on Assistant AP-717G
How to turn off the lock screen on Assistant AP-717G
How to delete app on Assistant AP-717G
How to recover contacts on Assistant AP-717G
Where is the recycle bin on Assistant AP-717G
How to install WhatsApp on Assistant AP-717G
How to set contact photo in Assistant AP-717G
How to scan QR code on Assistant AP-717G
How to connect Assistant AP-717G to computer
How to install SD card in Assistant AP-717G
How to update Play Store in Assistant AP-717G
How to install Google Camera in Assistant AP-717G
How to turn off Assistant AP-717G
How to charge Assistant AP-717G
How to use the camera on Assistant AP-717G
How to find lost Assistant AP-717G
How to set password on Assistant AP-717G
How to turn on 5g on Assistant AP-717G
How to turn on VPN on Assistant AP-717G
How to install apps on Assistant AP-717G
How to insert a SIM card in Assistant AP-717G
How to enable and configure NFC on Assistant AP-717G
How to set time on Assistant AP-717G
How to connect headphones to Assistant AP-717G
How to clear browser history on Assistant AP-717G
How to disassemble Assistant AP-717G
How to hide an app on Assistant AP-717G
How to download YouTube videos on Assistant AP-717G
How to unblock a contact on Assistant AP-717G
How to turn on the flashlight on Assistant AP-717G
How to split the screen on Assistant AP-717G
How to turn off the camera sound on Assistant AP-717G
How to trim video on Assistant AP-717G
How to check RAM in Assistant AP-717G
How to bypass the Google account on Assistant AP-717G
How to fix black screen on Assistant AP-717G
How to change the language on Assistant AP-717G
How to open engineering mode in Assistant AP-717G
How to open recovery mode in Assistant AP-717G
How to find and turn on a voice recorder on Assistant AP-717G
How to make video calls on Assistant AP-717G
Assistant AP-717G sim card not detected
How to transfer contacts to Assistant AP-717G
How to enable/disable «Do not disturb» mode on Assistant AP-717G
How to enable/disable answerphone on Assistant AP-717G
How to set up face recognition on Assistant AP-717G
How to set up voicemail on Assistant AP-717G
How to listen to voicemail on Assistant AP-717G
How to check the IMEI number in Assistant AP-717G
How to turn on fast charging on Assistant AP-717G
How to replace the battery on Assistant AP-717G
How to update the application on Assistant AP-717G
Why the Assistant AP-717G discharges quickly
How to set a password for apps in the Assistant AP-717G
How to format Assistant AP-717G
How to install TWRP on Assistant AP-717G
How to set up call forwarding on Assistant AP-717G
How to empty the recycle bin on Assistant AP-717G
Where to find the clipboard on Assistant AP-717G
How to Enable USB Debugging on Another Phones
